The emergency list is a real-time list of everyone currently signed into your facilities so that you can perform a roll call and ensure that everyone is located safely.
Accessing your emergency list
In the top-right of your dashboard, you’ll see the “Emergency List” button. When this is clicked, you will be taken to a page showing the list of all signed-in users and their location – the site and area they are signed into.
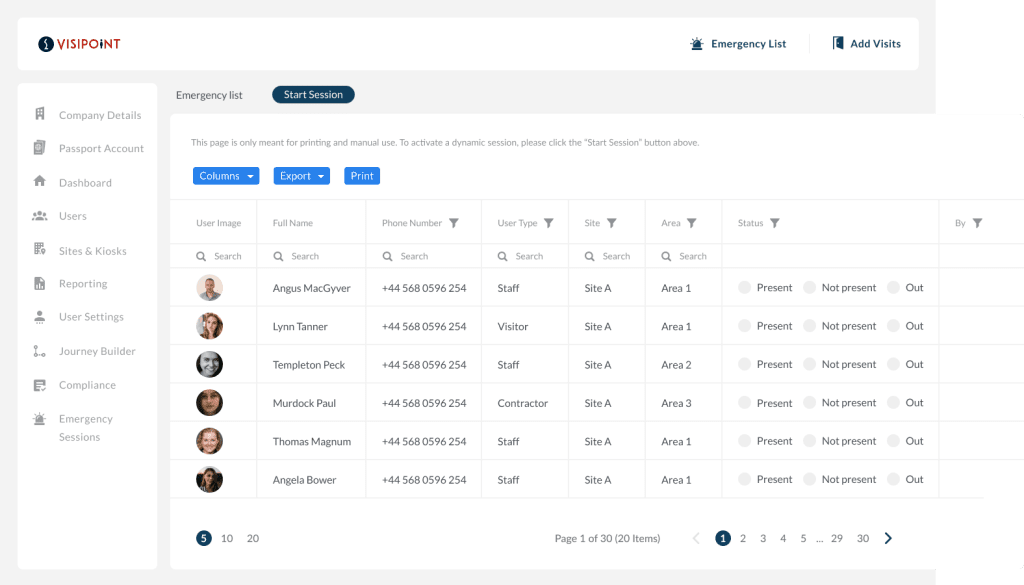
The above page is only meant for printing and manual use. You can print the list from any printer connected to your PC if you would prefer to use a paper list.
Next to each user, you have their ID picture for quick identification and their phone number (if provided) so that you can call them if required.
The grid will show any users whose visit statuses are “Signed in”, “Auto signed in” or “Checked in”. For the users with the visit status “Checked in“, the list will display them only if they have checked in “Today“.
“By” is an empty cell where you can write your name or the name of another admin who has located each user during an emergency if you print this page. The grid also includes the “Status” column. This has three options:
- Present: The individual has been located
- Not present: The location of the individual is unknown
- Out: The individual left the premises before the emergency occurred (if the user has forgotten to sign out)
To use the list dynamically as a roll-call, you will start an Emergency Session. This is the recommended way to use emergency lists. In this manner, the admins could have the session open from a browser on a tablet device or mobile device while at the emergency point.
Start an emergency session
To activate a dynamic session, you should click the “Start Session” button at the top of the Emergency list page.
You will then see the screen below where you are taken through a few steps to set up the session.
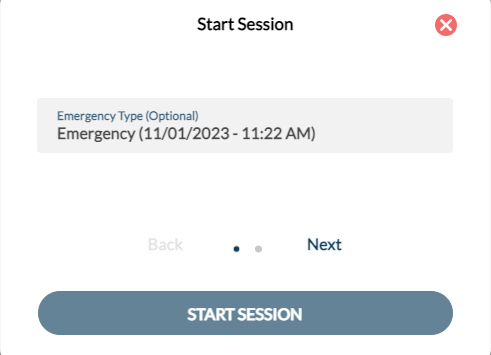
- Emergency Type: A text field allowing you to provide context for the emergency, making it easier to identify what this session was for in your records. For example, you could enter “Fire Alarm Test 15/11/22”. The maximum number of characters your Emergency Type title can be is 24. You can leave this as the default information provided by the system as shown above, which simply saves the name as the date and time.
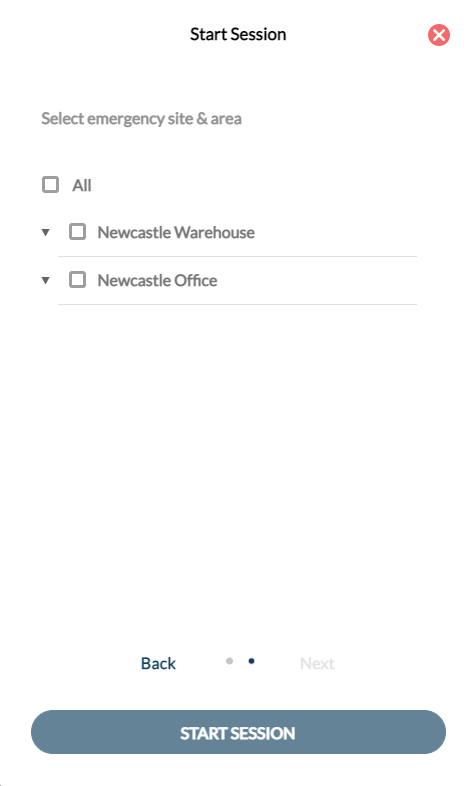
- Sites: A mandatory field. You can select one or multiple sites. If all areas inside a specific site are selected for another session that is already in progress, this site won’t appear in the dropdown list.
- Areas: A mandatory field. You can select one or multiple areas. This dropdown will show your areas grouped by site. Clicking the arrow next to the site will reveal the areas within that site that you can select. Areas will only appear in this dropdown if they are not already selected in any other active sessions.
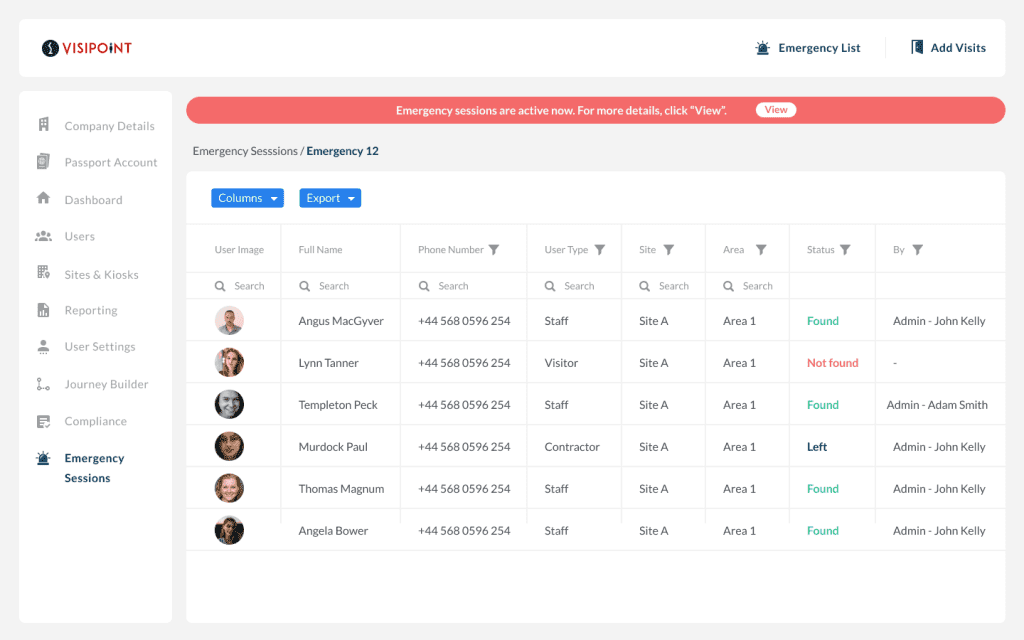
Once you start a session it will be referred to as active and you will see a red alert banner at the top of the dashboard which alerts admins that an active session is in progress.
Joining an active session
Other system admins can join this session by going to the dashboard and selecting the “Emergency Sessions” option at the bottom of the left-side menu.
They can join any active session by clicking the “Join” button in the “Actions” column. Doing this will take them to the emergency list for that active session, allowing them to also mark users as found.
Another way for other system admins to join your session is by clicking the “View” button, in the red alert message which appears at the top of a dashboard when an emergency session is in place. Clicking on “View” will take you to the active emergency sessions list to view or join them.

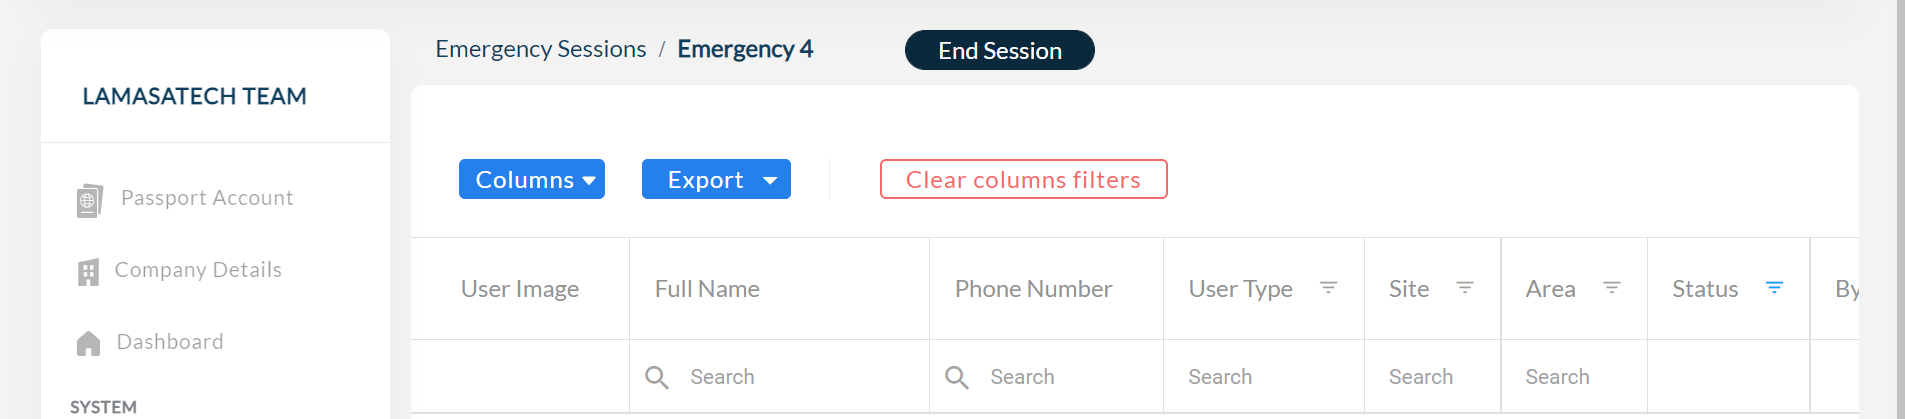
Using the emergency grid
The grid includes user information such as:
- User image
- Name
- Phone number
- User type
- Site
- Area
Admins can start to go through the list and update the status of each user. As default when you start a session, all users will have the status of ‘Not Present’ until they are marked otherwise. You have 3 options for status.
- Present: The individual has been located
- Not present: The location of the individual is unknown
- Out: The individual left the premises before the emergency occurred (if the user has forgotten to sign out)
When an individual is marked as ‘Present’, their name will disappear from the list. This is to make it easier for admins to carry out the remaining register by only seeing those users who still have the status ‘Not Present’. If you would like to see the full list, you can click on the Status column header and tick all statuses to display them.
As admins update the statuses of users, the grid will instantly mark which admin updated the status in the “By” column. All admins who have joined the session will be able to see any changes to a user’s status made by the other admins.
Once you have registered all individuals or you are happy for the session to end, click the “End Session” button above the grid.
Emergency sessions history
In the side menu, you will find the Emergency Sessions option. Clicking this will take you to a page that contains a grid of your emergency sessions – both active and completed.
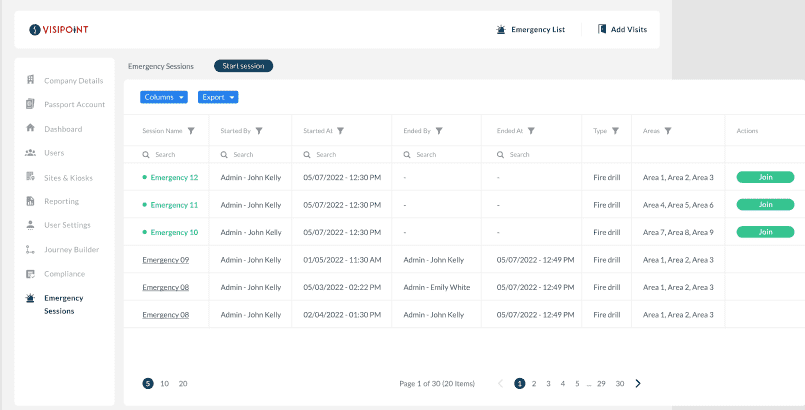
As well as also being able to start a session from this page you can:
- Export your emergency lists from ended sessions via Excel, CSV or PDF
- Join any active sessions by clicking the “Join” button in the “Actions” column
- Edit which columns of data are displayed in the grid by clicking on the “Columns” button and selecting which to show
The columns you have available to display are:
- Session Name: This name will be generated automatically, the first emergency session will be “Emergency 1“ and so on. You can click this name to view that session page (active or ended). The colour will be green if the session is active.
- Started By: The name of the admin that started the session.
- Started At: The date and time the session was started.
- Ended By: The name of the admin that ended the session.
- Ended At: The date and time the session ended. If the session has not ended yet, it will display -.
- Areas: All the areas selected by the admin when starting the session.
- Type: The “Emergency Type“ entered by the admin when starting the session.
- Actions: Will display a “Join” button if the session is active.