About the journey builder
The Journey Builder screens allow you to define the entry and scanning criteria – defined as ‘Flows’. You can have one flow for all user types or separate flows for each user type, such as one for employees and one for walk-in visitors.
This is useful when you want certain steps to be present in the check-in process for select users and not for others. For example, you may want walk-in visitors to have an ID badge printed for them, whereas this is not required for employees. This would be controlled by having one user flow for walk-in visitors and another for employees, each with the relevant steps built into the user flow.
When creating/editing your login process/user journeys, you should follow these steps:
- Create your journey
- Build your flow(s) within the journey
- Apply the journey to an area
- Activate touch mode and choose the user types to display on the kiosk
Important – Each user type can only be selected in one user flow within a journey. A user type can belong to a second flow, only if the other flow is within another journey. This only works if you are using a second kiosk/area, as only one journey can be applied to a kiosk/area.
Examples
Scenario 1:
If your users will follow the same login process at any of your areas/kiosk you can simply create one journey. You can then create one flow for all user types, or separate flows for different user types within this journey. For example, you have one process for staff and one process for visitors. This process is the same at all kiosks/areas.
In this scenario, you will create 1 journey. Within that journey, you will have 1 flow for staff and 1 flow for visitors.
Scenario 2:
If the entry process should be different at your various/kiosks or areas, you will create multiple journeys. You can then create one flow for all user types, or separate flows for different user types within each journey. For example, you have one process for staff at the head office and you have a different process for staff at the warehouse.
In this scenario, you will create 2 journeys, 1 for head office and 1 for the warehouse. Within each journey you will have 2 flows, 1 flow for staff and 1 flow for visitors.
Accessing the journey builder
The journeys on your kiosks can be edited remotely when using the online journey builder in your cloud account.
From your dashboard, navigate to Journey Builder from the left navigation.
Editing the default journey
When you edit your journeys for the first time, you will find that there’s a default journey and flow already populated, which includes all three default user types (Staff, Visitor, Walk-In).
Using the available actions drop-down list on the right, you can edit the journey, add a flow, edit the flow or delete the journey/flow.
Edit default journey
By clicking on the Edit Journey option you will be able to edit the name and description of the journey in the boxes at the top.

Instructions screen for non-touch journeys
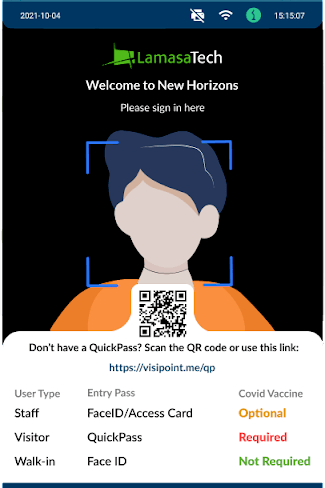
Next, you can choose to display sign-in instructions on your kiosk screens. This can be helpful when you are using non-touch journeys. If you check the box next to the user type, the instructions for this user type will be shown on the screen.
For example, you may decide that staff doesn’t need to show as staff members know to sign in with their access card. However, you may wish to display sign-in instructions for visitors and walk-ins.
The below image shows instructions on screen for staff, visitor and walk-in user types. The entry pass column tells users what method they can use to sign in, and if you are using a vaccination status check the requirement will show in the third column.
If you don’t want to show any instructions on screen, then you can simply leave the checkboxes unticked.
Touch mode
In the final section, you can choose to active touch mode by switching the toggle onto green. Touch mode allows users to sign in by entering their details on the touch screen (compatible devices only). Learn more here.
When touch mode is activated you will be presented with two options either Quick Name match or Private Name match.
Quick Name Match: Once the user types in the first three letters of the first or last name the system will display all users with the same matching results.
Private Name Match: The user needs to type in the full first name and then the first three letters of the second name to be presented with the available matching profile. Private name match is useful if you have a lot of users with the same first name as quick name match would return a long list.
Edit default flow
To edit an existing flow you should click on edit flow from the Available Actions. You will then be taken to the flow builder, which is explained in the section below.
If you update any of the steps in the flow, for example, if you remove a user type, you need to make sure that you click on the green arrow beside the field to refresh it, before clicking on the Save Journey Builder button.
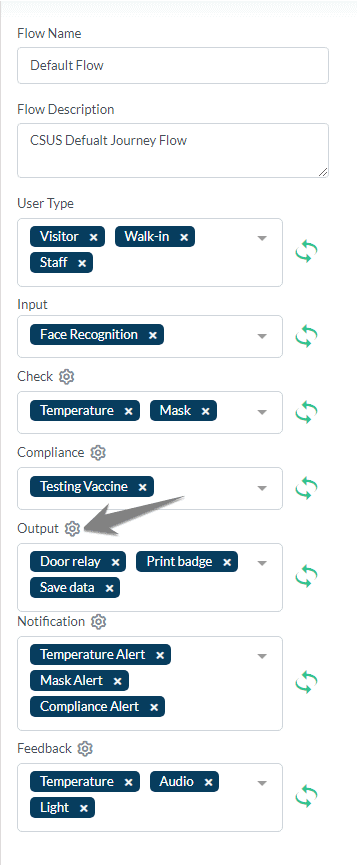
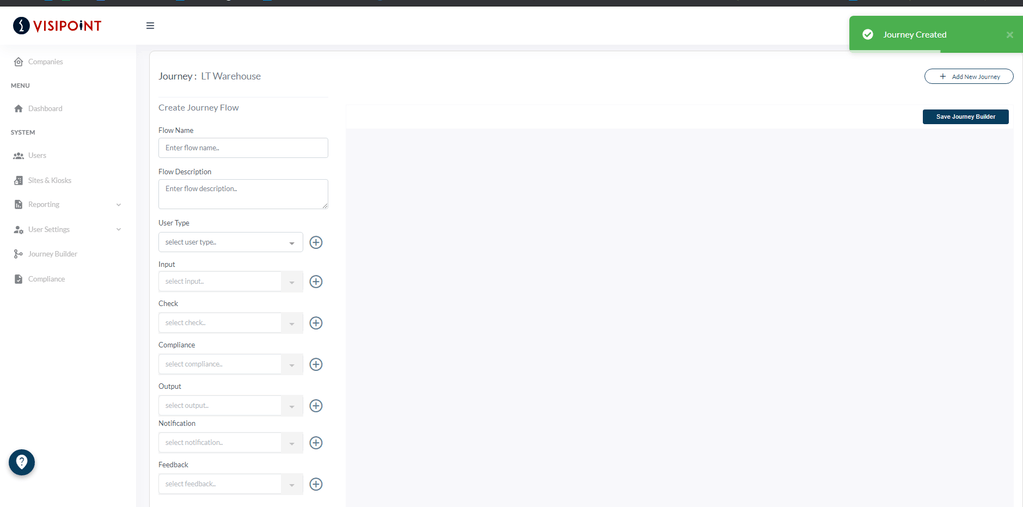
Using the flow builder
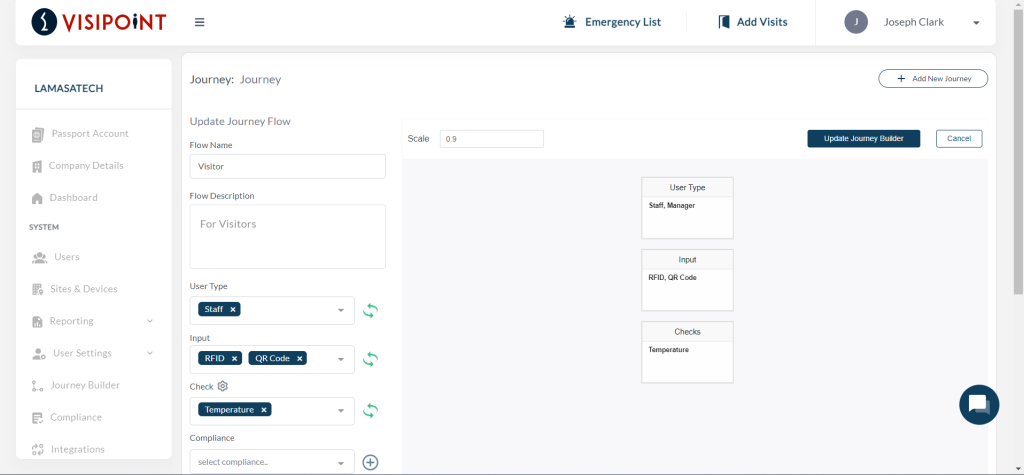
When you select add flow or edit flow you will be taken to the flow builder page, shown below.
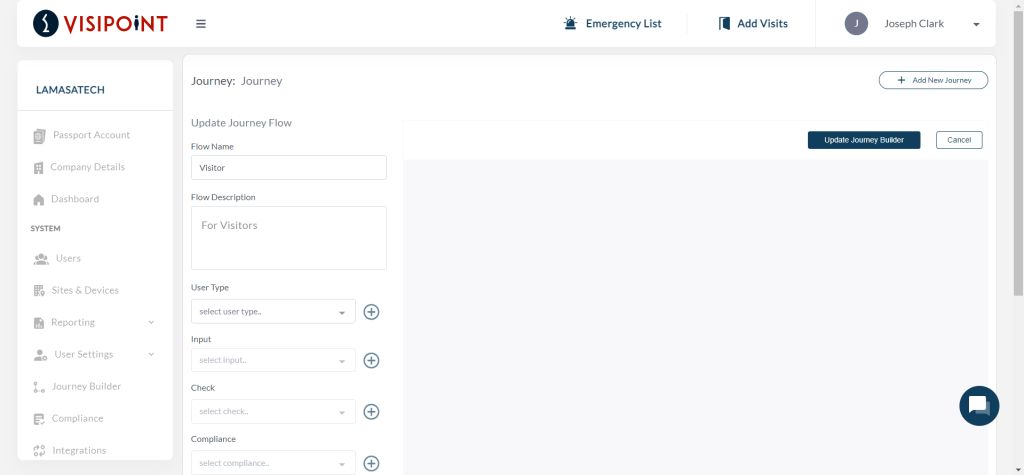
Each field after the description represents a step in the user journey. When you click on each field, a drop-down menu will appear and you can select from the options. When you select your options you should then click the blue plus icon next to the field and it will then appear on the right, so you have a visual representation of your flow – as shown below.

When you update any steps in the flow, the blue icon next to the field will change to green arrows (as shown above next to the user type field). You should then click the green arrows to update the step.
User Type:
The user type drop-down will include all user types. You will only be able to click on the ones that are not already assigned to a flow within the journey.
The user types which already have a flow will appear greyed out in the list. If the user type you want is not available, you must first remove the user type from the other flow it belongs to.
Input:
This is the entry method whereby a user is identified by the kiosk.
One of the following input types must be selected, unless you are using touch mode. If your journey has touch mode activated, you can use any of these inputs alongside touch mode or leave input blank to use touch mode alone.
- Facial Recognition
- RFID
- QR code
Facial recognition is used if your registered users have pictures assigned to them in the system.
RFID is used if you wish to let users sign in by tapping their access card or fob on the kiosk reader. Each user will need to have their RFID number added to their user profile.
QR code is used if you wish to allow users to sign in using a QuickPass QR Code.
If multiple input methods are selected, any of the selected methods can be used to gain entry.
Check:
This determines any check that will be carried out, such as temperature or mask check.
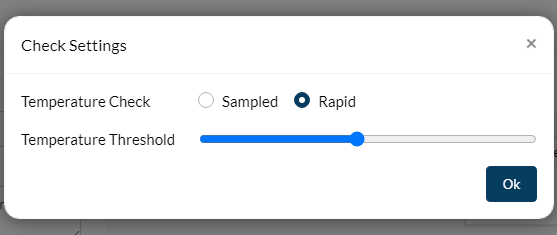
If you have added a temperature check, a cog settings icon will appear next to check. By clicking on the cog settings you can edit the temperature settings. You can set the temperature threshold (the limit above which a temperature is considered too high). By default, this is set to 37.3°C. You set this by using the slider.
You can then set the Temperature Check type from the following
- Rapid – The kiosk takes a single temperature sample and uses that value
- Sampled – The kiosk will take a number of samples across a three-second window and return an average result
The mask check allows the kiosk to detect if individuals are wearing a mask. If you have this set to on, an individual without a mask will be denied entry and presented with an instruction to wear a mask.
Compliance:
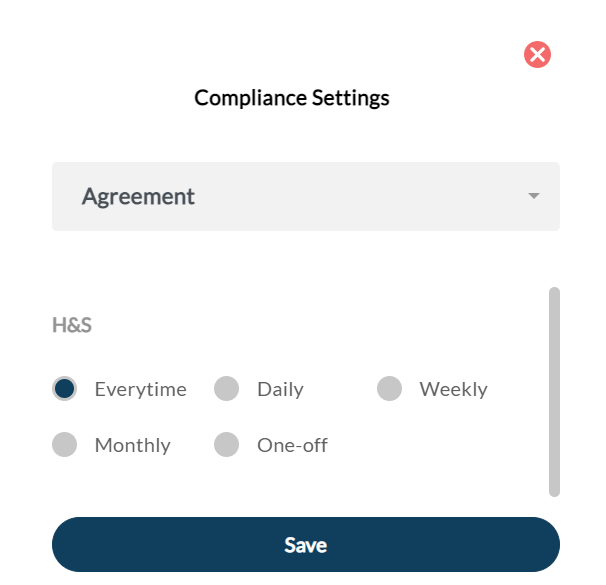
Here you can select any compliance checks that must be reviewed and completed by the user during the login process on your kiosk. All agreements and questionnaires that have been created in the Compliance Creator will be listed. If you need to create a compliance check, please go to Compliance from the left navigation and then come back to the builder to add the compliance into the flow.
When you have a Compliance added in the flow and you can add as much as you want, you can select how often the compliance will be required to be answered by clicking on the cog settings icon. You can choose from:
- Every time
- Daily
- Weekly
- Monthly
- Valid Till Expiry ‘ In case of Document-Vaccine/PCR’
- One-Off ‘In case of Questionnaire or agreement
Output:
Here you can choose from the outputs that occur when a scan is successful.
– Door Relay – Control of the door connection to the relay cable. You can choose for a door to open based on a successful scan.
– Print Badge – Choose to print an ID badge automatically (if you have a compatible ID badge printer). To define what information is printed on the ID badge click on the cog settings icon that appears next to Output. You will then see the window below, where you can use the toggle to select if each element should show on the badge such as user type and name.
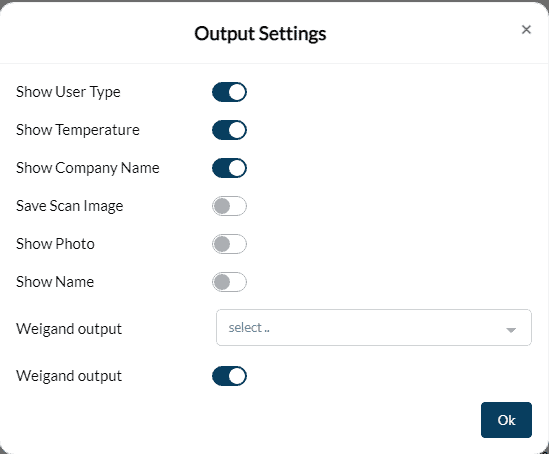
– Save Data – Choose if you wish for your scan data to be saved or not.
– Output Settings: When you click on the Cog icon beside the Output section you can edit your Output settings for print badge, save data and door relay.
You will then see the following screen.
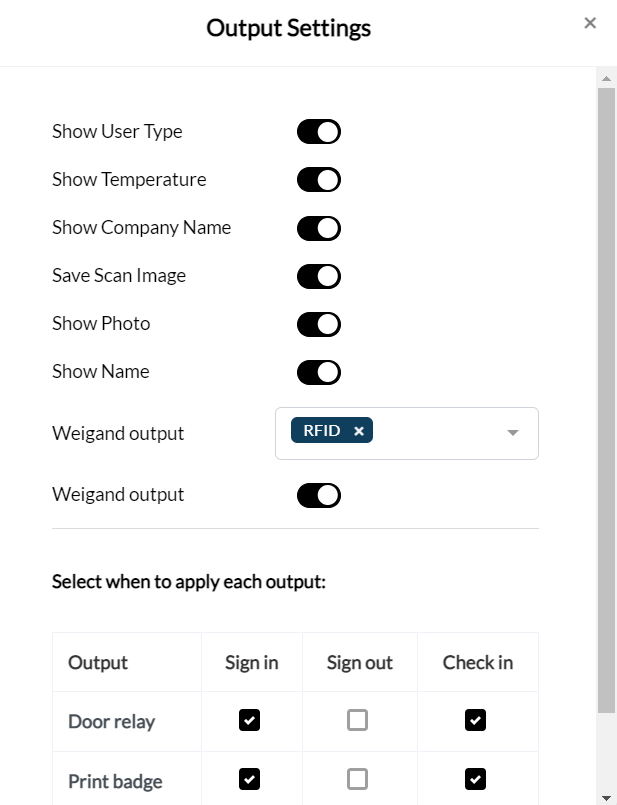
You have the option for which elements are shown on the printed badge (as discussed above) plus save scan image. This option allows you to select whether images from entry scans should be stored or not. You then have Weigand settings which are for using if you are integrating with your door relay.
Notification:
An email notification can be sent in the following scenarios:
- A temperature above the threshold
- No mask is detected when a mask is required
- A compliance check has failed (the desired answer was not provided)
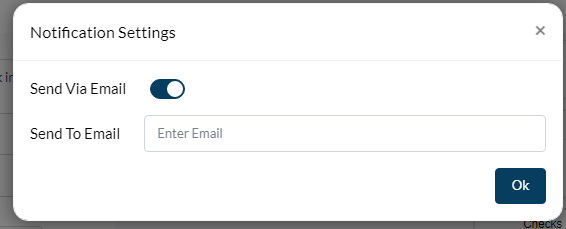
To set the email addresses which will receive the notification, please click on the cog settings icon and the following window will appear. Please ensure the toggle is switched on, enter the email addresses for notifications and hit the Ok button.
Feedback:
Here you will select the feedback that the individual using the kiosk will receive after their scan is completed.
- Audio – When this is turned on, the kiosk will play a granted or denied audio message.
- Temperature – When this is turned on, the temperature reading is displayed on the screen.
- Light – When this option is enabled a light at the top of the kiosk will display on completion of a scan; green for granted and red for denied.
You can click on the settings cog icon to edit your feedback settings.
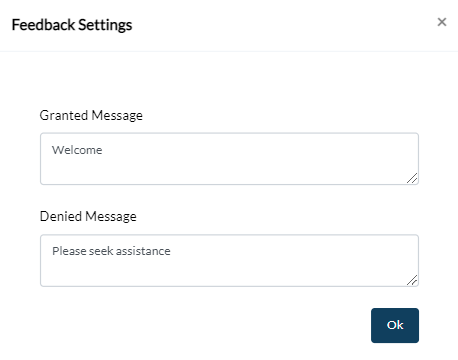
You can edit the granted message for successful scans and the denied message for those who have failed one or more entry criteria and will be denied entry on the kiosk.
The below image is an example of how a complete flow will look with each step previewed in the flow diagram on the right. Once complete, please click on Save Journey Builder. Don’t forget to click on the blue plus sign or green arrow sign next to a field once you have edited a field, before clicking on the save button.
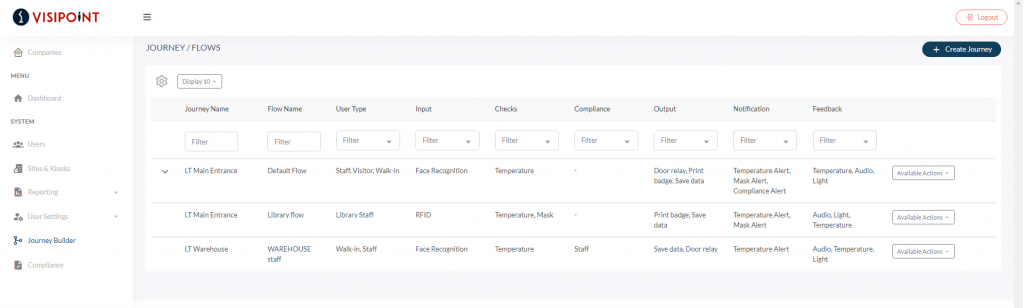
Once the flow is added you will get a success message and you will be taken back to the main journey builder page which displays the grid of journeys and flows.
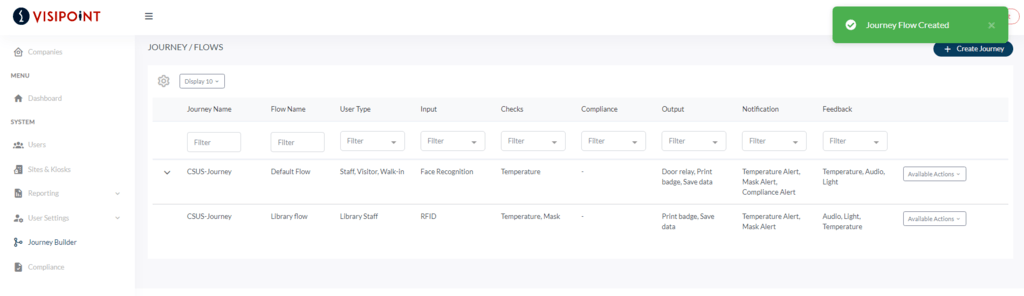
Flows are nested under journeys so you may need to click the grey arrow on the left to dropdown the journey so you can see all the flows.
Add a new journey
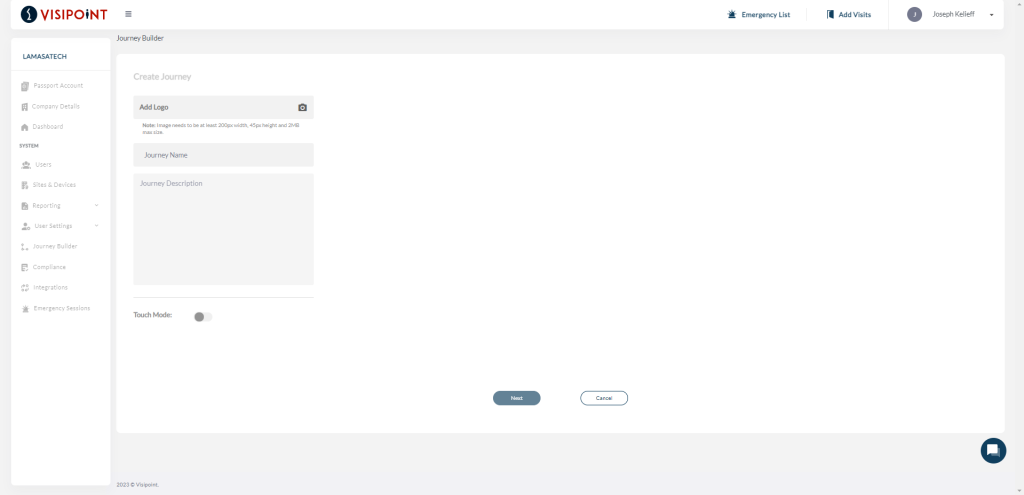
Click on Create Journey on the right side of the screen, This will take you to a screen where you will be asked to add the journey name and description.
You can also choose to switch on Touch Mode, as covered above.
Once complete, please click the Next button.
Upon creating a new journey you will get a success message and then be taken to the flow builder page. You will then create your first flow for this journey. Each journey must have one flow created within it. Since this is your first flow for this journey you will notice that all options and user types are available to you (since nothing is assigned to another flow within this journey).
Add a new flow
If you wish to add a new flow to an existing journey you must first check if the User Type is already in use in another flow. If so, you must first remove the User Type from the existing flow. Otherwise, you will not be able to select the User Type you want in the flow builder. A user type can only exist in one flow within a journey.
Please follow the steps above in Using the flow builder above to build your flow. Be sure to click on the plus sign after filling in each step based on your preference. Then click on Save Journey Builder.
Once you save a new flow you will be taken back to the journey settings.
If you are using non-touch mode, you can now configure the instruction screen for the user types you have just created a flow for. Please refer to the section above on the Instructions screen for non-touch journeys.
If you’re using touch mode and don’t need to make any changes just go straight to update at the bottom.
Once you have saved your journey you will be returned to the main journey builder list with the list of journeys.
You can click on the drop-down arrow next to a Journey Name to see all the multiple flows assigned to the journey.
In the example below, you can see we have 2 journeys – LT Main Entrance and LT Warehouse. Within the LT Main Entrance journey, we have the Default Flow plus Library Flow. Whereas the LT Warehouse journey has only one flow for Warehouse Staff.
Apply journey to your areas/kiosks
When you are done setting up your Journeys and Flows, you must then assign the journey to an area so that the flows can run on your devices in that area.
Go to Sites and Kiosks from the left navigation.
Click on a Site name. You will then see a grid list of your Areas within your Site.
Click on the Area Actions button under Area Settings. Click on Edit Area and the window below will appear.
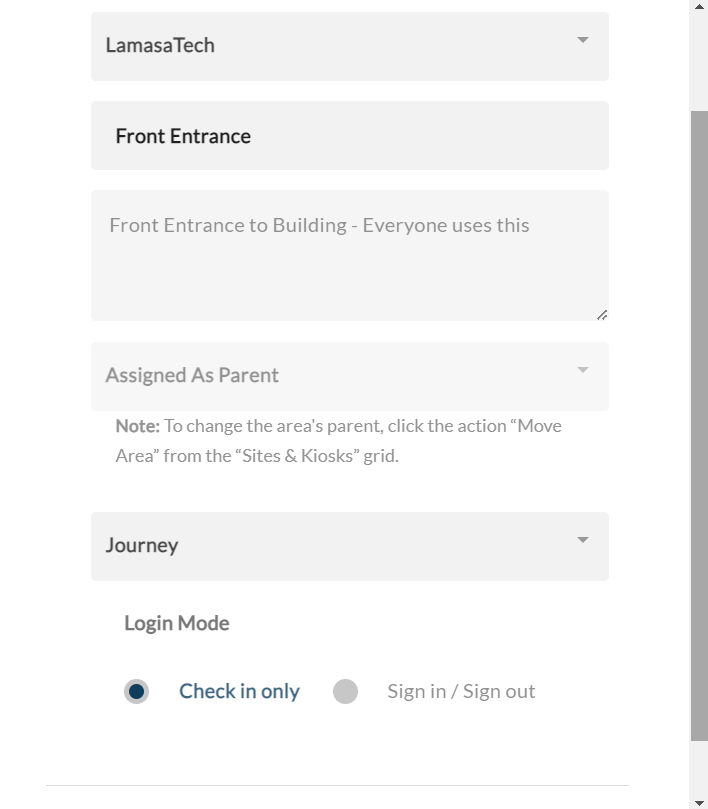
In Select Journey, you can then choose the journey which you want to assign to the kiosks in your area. Once finished, click Update.
Please note that each area can only have one journey assigned to it.
You can change the assigned Journey on individual kiosks assigned to an area, from kiosk actions choose change journey, and you will be presented by pop up as below:
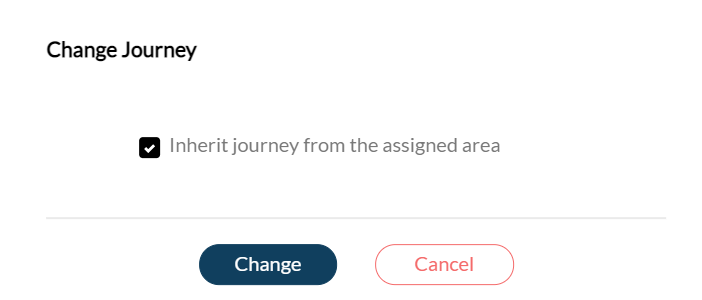
You will be able to either choose the same Journey applied to the area by ticking the box saying “Inherit Journey from the assigned area” or if you untick this it will display a dropdown box allowing you to choose another journey.

Delete a journey
If you choose to delete a journey, please ensure you first assign another journey to your kiosks, from the Sites & Kiosks page. Otherwise, there will be no journey on your kiosks which will cause an error. Once you click on delete you will be presented with a pop-up message to confirm you wish to delete this. The flows that belong to that journey will also be deleted.
Delete a flow
If you are deleting a particular flow, you must first remove the user type from the flow, or re-assign it to another flow. If you delete a flow without removing or reassigning the user type, this will result in errors due to the user type having a deleted flow.