Integrating your MIS allows you to sync your student directory into VisiPoint. Any changes then made to these user profiles in Wonde will be automatically reflected in VisiPoint the next time the system completes a sync.
Add new integration
To add a new integration with MIS, click on Integrations from the left navigation within your VisiPoint Cloud dashboard.
You will then see a box named School MIS. Click on the plus symbol and the following pop-up screen will appear for you to select if you already have a Token API or not:

Already have the Token API
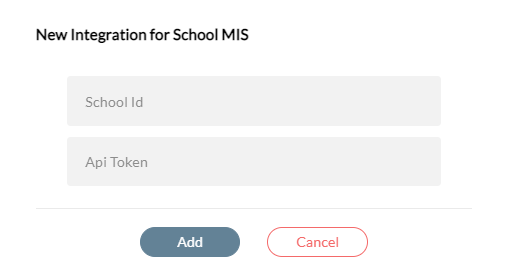
Selecting “I have the Token API” will then prompt you to enter the key credentials required to proceed, your MIS School ID and API Token.
Don’t have the Token API
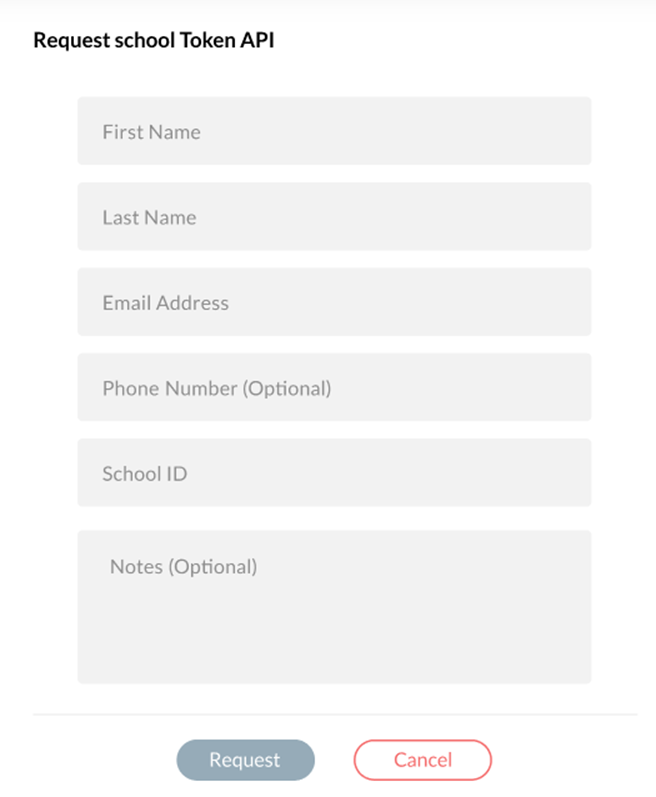
If you do not have the required information, you will need to select “I don’t have the Token API”. You’ll then be asked to enter the details needed to request the Token API.
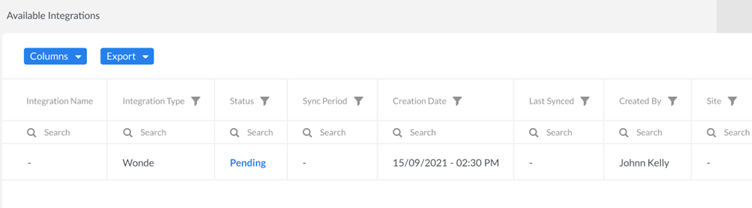
While the request is being processed the integration will have the Pending status.
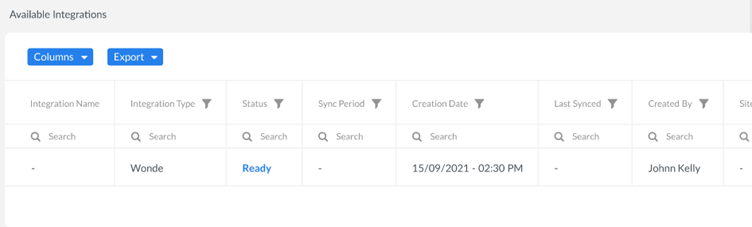
Once you have received the Token API information, the status of the integration will be changed to Ready meaning you can now start the integration process.
Integration settings
The first time you create your School MIS integration, you will need to enter your credentials. When these have been authenticated you will be directed to the Integration settings page.
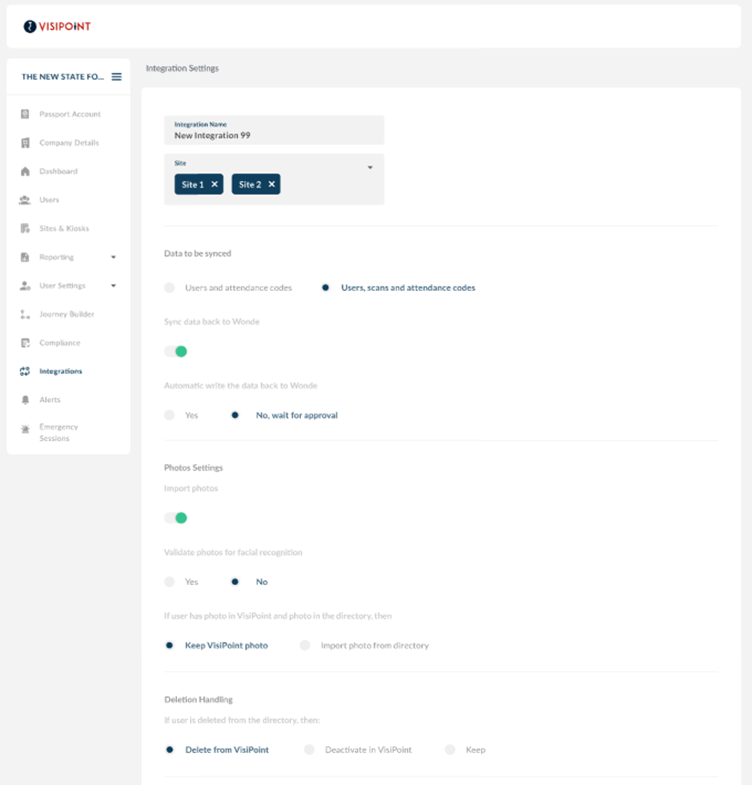
First, you will be able to name your integration which will help you identify it in your integrations list. Then, you’ll need to select the sites for this integration.
Within the Data to be synced section you will see two options:
- Users and attendance codes – VisiPoint will read the information from your integration only.
- Users, scans and attendance codes – VisiPoint will read from your integration and also write back. This means any changes that you make in VisiPoint will be reflected in your integration.
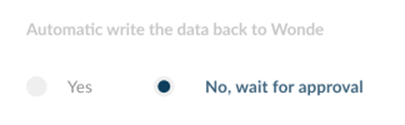
If you opt to write back to your School MIS you can also have it done automatically or submit it for approval first.
Next, you will determine the settings for importing photos.
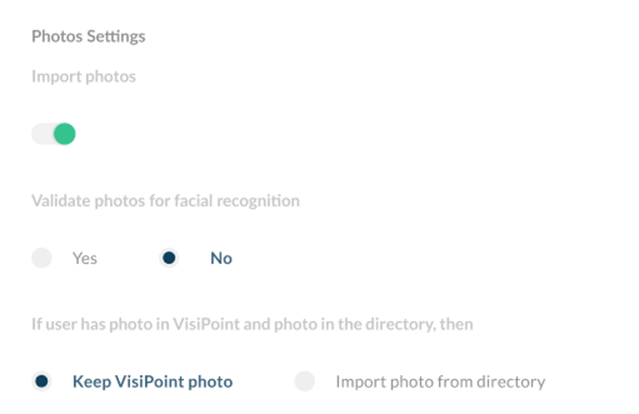
Here you can import the photos your School MIS has for each user. This can then be used to validate a user if you are using the facial recognition entry method.
You can also choose which photo to use if a user already has one saved in VisiPoint.
After this, you will set how the deletion of profiles should be handled.
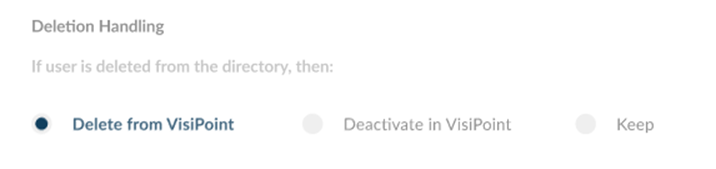
You have three options to choose from:
- Delete from VisiPoint – If a profile is deleted in your School MIS it will also be deleted in VisiPoint
- Deactivate in VisiPoint – If a profile is deleted in your School MIS it will become inactive on VisiPoint and could not be used to sign in the user but the profile details will be retained
- Keep – If a profile is deleted in your School MIS it will be retained in VisiPoint and remain active
Mapping
Next, you will begin mapping your fields in your School MIS to the user fields within VisiPoint.
The groups of users in your School MIS should be mapped to the user types created on your VisiPoint dashboard. You can map multiple groups from your School MIS to the same user type in VisiPoint.
If you do not map a group to a user type, that group of users will not be imported to VisiPoint. You would need to create a new integration with the same credentials if you wanted to map that user group at a later stage.
All the fields used in the directory (First Name, Family Name etc) should be mapped to the ones that exist in the company’s dashboard (First Name, Last Name etc).
You cannot map multiple fields from your School MIS to one field in VisiPoint.
If there are fields that are not mapped, their values will not be imported into VisiPoint.
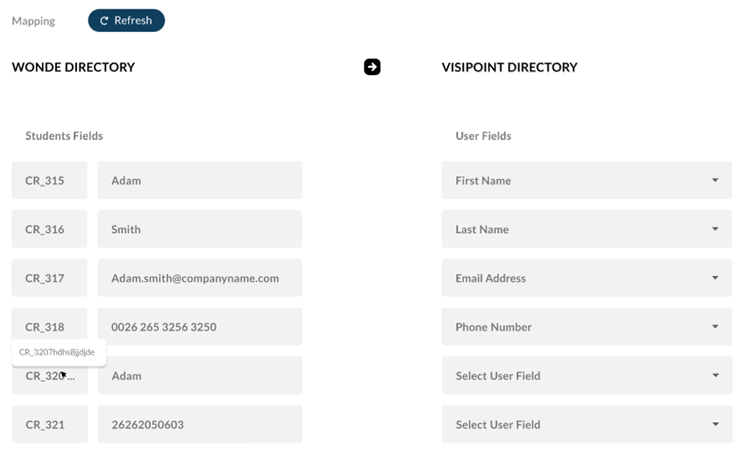
For each field under your School MIS, you will need to ensure the correct mapping has been done by selecting the field that matches this under VisiPoint.
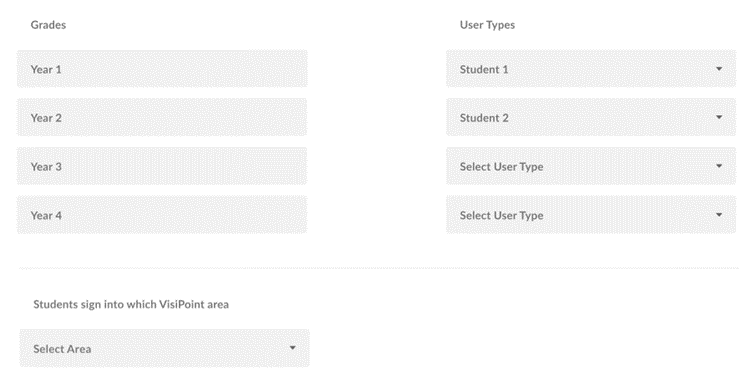
You will then need to map the Grades of your students to the User Types you have in VisiPoint. Remember if you do not map a group the users within that group will not be imported. For example, if you only mapped Years 1 and 2, students from Years 3 and 4 would not be imported.
You’ll also need to select the area where the students will be signed into.
After this, you will also need to map your staff. This is done in the same way as your students, by mapping fields in your School MIS to user fields in VisiPoint and groups in your School MIS to User Types in VisiPoint.
Once this has been completed click Save & Sync to begin syncing this data.

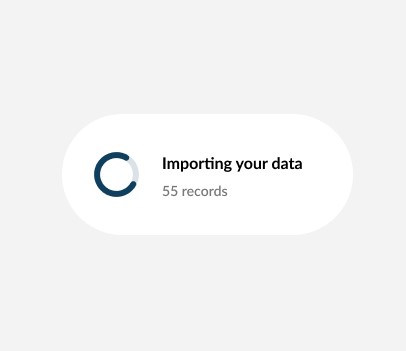
Once these steps have been completed the importing process will begin.
Importing data
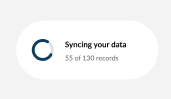
As the import begins you will see a message with the import status, similar to the one below.
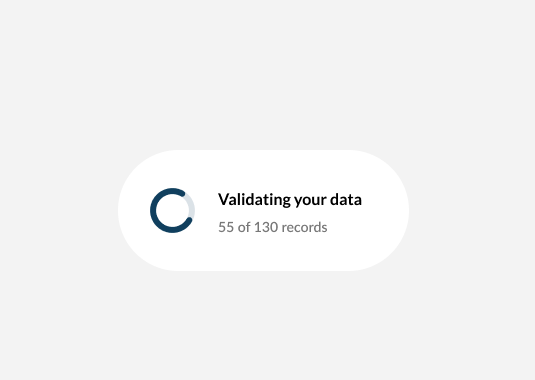
Then the validating process will start to check the importing data, to categorise any errors or duplications of users already in VisiPoint.
You will then be directed to a grid showing the Errors List (if any exist), the Duplicates List (if any exist), and the records that have no issues. You will need to fix all the errors and duplicates before confirming the sync.
If the first sync was interrupted for any reason, the integration status will be saved as a “Draft”. You can resume it at any time to complete the process.
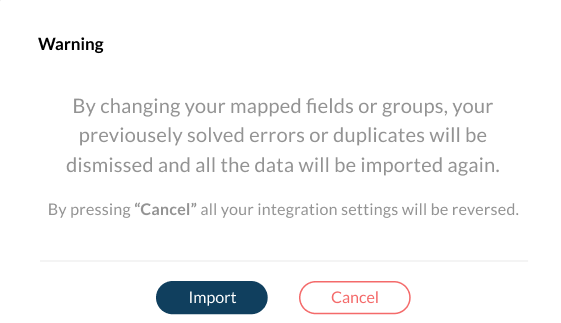
If you go back into Integration Settings and change the mapped fields or groups after importing the records from your School MIS, a message will appear informing you that if you continue all the data will be imported again, taking into consideration the new mapping.
Error List
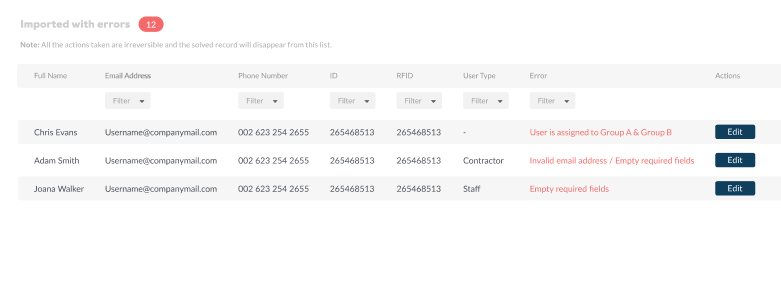
The errors that may appear are:
- One of the required fields (First Name or Last Name) in VisiPoint is empty, i.e. you didn’t map any fields from your School MIS to the required fields in VisiPoint
- The email address field has a non-email format value, i.e. you mapped a non-email field into the email address field in VisiPoint
- The user exists in more than one directory group
You can click the edit button to edit the users that have errors.
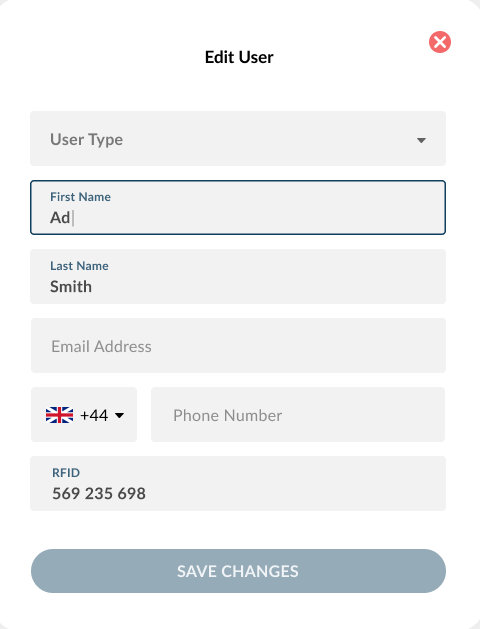
When you fix an error, it will disappear from the error list.
During the first sync process, you will not be able to start fixing the duplicates until you fix all of the existing errors.
Duplicates List
If the imported user record has the same first name and last name and email address or phone number as a user that already exists in VisiPoint, the user will be listed in the duplicates grid.
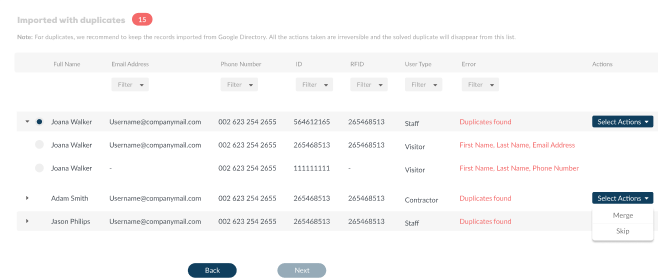
Here, you will be able to select duplicated users and merge them into one user profile.

You can also choose to skip a record, i.e. the one imported from your School MIS will not be synced to VisiPoint.
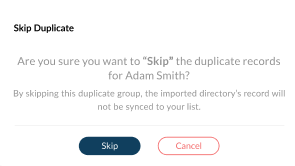
When you fix any duplicates, they will disappear from the Duplicates List.
During the first sync process, you will not be able to check all the records ready to be synced until you fix all of the existing duplicates.
All Records List
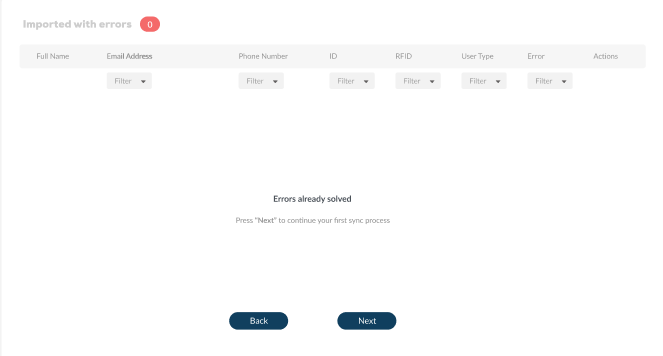
This list will appear during the first sync process and it will display all the records that have no issues after fixing all errors and duplicates.
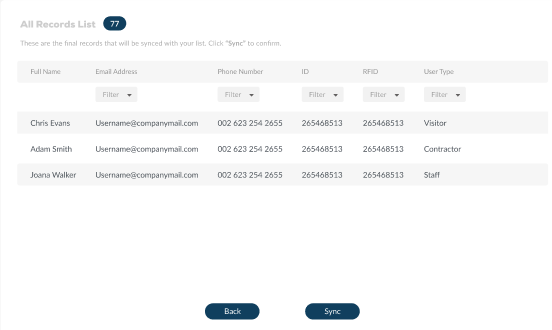
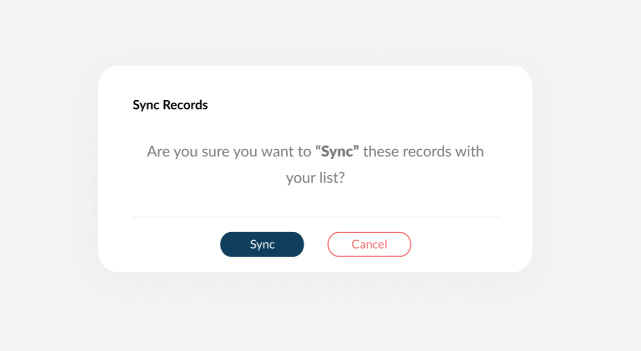
When you click “Sync”, you will see one final pop-up screen to confirm the records sync.
You will then see a message which shows the status of your sync.
Ongoing sync process
After syncing your School MIS records into VisiPoint, the directory’s user ID will be added to the user’s record in the VisiPoint database. This means if this record is updated on the directory’s side, the system will be able to update the corresponding record in VisiPoint with the next sync process.
The sync process will be run automatically for every chosen period. You will be able to set this period as daily, weekly or monthly. You can also choose to run the sync manually at any time.
When the sync process is run again (after the first sync is done) manually or automatically, the imported user records that don’t have any errors or duplicates will be imported directly. Any errors or duplicates will be listed in their grids, for the admin to resolve.
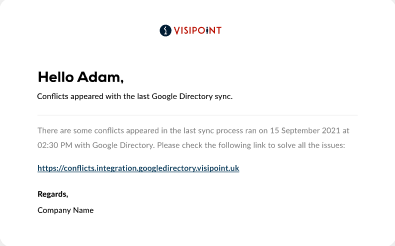
If there are any errors or duplicates detected after the sync process is done, an email/SMS notification will be sent, informing you that there are some issues to be resolved in the last sync.
If a record is deleted from the directory, it should be automatically deleted from/deactivated in/kept in VisiPoint based on the action you selected on the Integration Settings page.
You can deactivate the integration, which will stop the automatic sync, but you will still be able to run the sync manually.
List of integrations and status
When you navigate to the Integrations page from the menu on the left of your dashboard, you will see a grid of your integrations (if you have any set up). The status will be shown for each. You can check the definition of each status below:
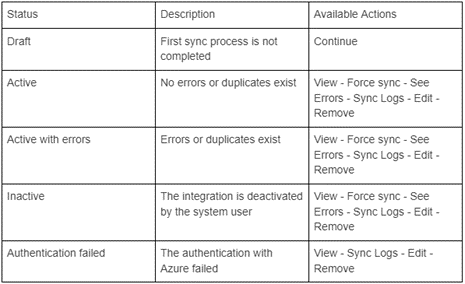
The image below shows the status column and the available actions for each integration.
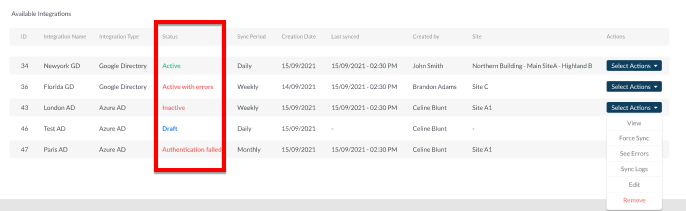
- View
Redirects to a page where you can check all the integration details.
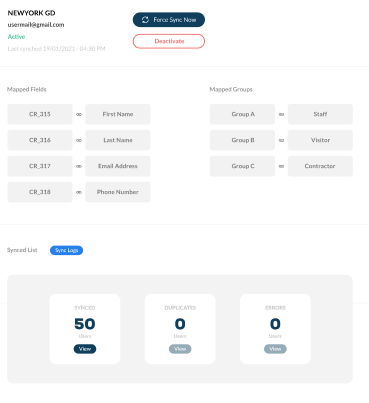
You will be able to deactivate the integration to stop the automatic sync schedule or reactivate it if it is currently deactivated.
There will be statistics showing the number of errors, duplicates & records synced successfully.
- Force Sync
Allows you to run the sync manually
- See Errors
This option will appear if there are errors in the integration. If you click this you will be redirected to the Errors grid.
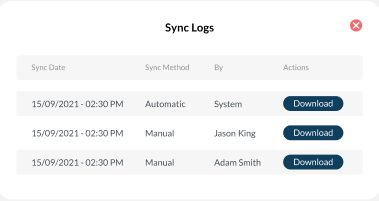
- Sync Logs
If you click this, it will open the sync logs.
- Edit
Redirects you to the Integration Settings page to make adjustments.
The mapping fields will be disabled if there are unsolved errors or duplicates.
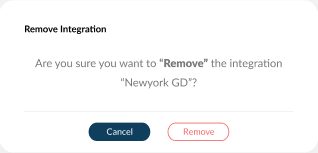
- Remove
Allows you to remove this integration. A pop-up will appear asking you to confirm that you want to remove the integration.
- Continue
This option will appear only if the integration status is “Draft“. If you click this, you will be directed to the last screen before the first sync process was stopped.
If you need any help implementing this integration please reach our support team from the live chat bubble within your dashboard.