How sites, areas and kiosks work together
When using a VisiPoint cloud license, your kiosks will always be assigned to a site, and an area within that site.
This allows you to edit kiosk settings (e.g. brightness, schedule reboot, date format etc) at kiosk level, at area level, or at the site level. This means you can apply settings to kiosks individually or in bulk at once.
You also control the user journey (the steps users go through during the sign-in process on your kiosks) at the area level. This means you can apply user journeys to multiple kiosks at once.
If you want to apply user journeys to individual kiosks, you can create an area/nested area for each kiosk.
- Site = You can control the kiosk settings for all devices assigned to a Site. For example, Newcastle Office.
- Area = You can apply your user journey and also control kiosk settings for all devices in an area. For example, Main Reception.
- Nested Area = You can apply your user journey and also control kiosk settings for all devices assigned to an area. For example, Door 1.
Sites
To update your Kiosk settings from the VisiPoint dashboard, we should go to Sites & Kiosks from the left navigation panel.
You will be presented with a grid of your sites.
On the right-hand side of your grid, you will see a Site Actions button next to each of your sites in the grid. If you click on this button a drop-down menu will appear with 3 options.
- Site Kiosk Settings = You can set all settings across all of your devices on your site to the same settings by editing them here.
- Edit Site = Here you can edit the site name, time zone, and reception email for site email notifications.
- Delete Site = You can delete a site by clicking this option. Be careful with this. Please ensure you have migrated all associated areas, users & kiosks first!
- Add Area = Here you can add additional Areas within your Site
- Kiosk Settings = This will allow you to edit all the Kiosks within the Site at once.
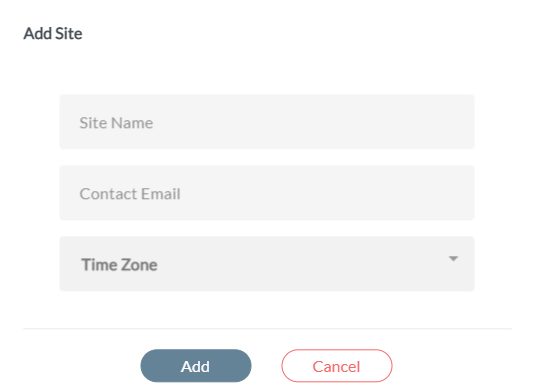
Add a new site
To add a new site, click on the Add button at the top of the page and then click Site. It will display this pop-up window. Please add the site name, an email for site email notifications and select your time zone from the list.
Areas
Click on dropdown arrows of the Site to view any Areas made within them.
In the Areas grid, you will see area names, the kiosks assigned to an area, the user journey assigned to the area and more details in each kiosk such as offline/online sync status.

You can have nested or child areas too, which effectively means a subarea.
A small grey arrow on the left of a row indicates that you can click this arrow to expand the row. This will expand to show nested areas or multiple kiosks within an area.
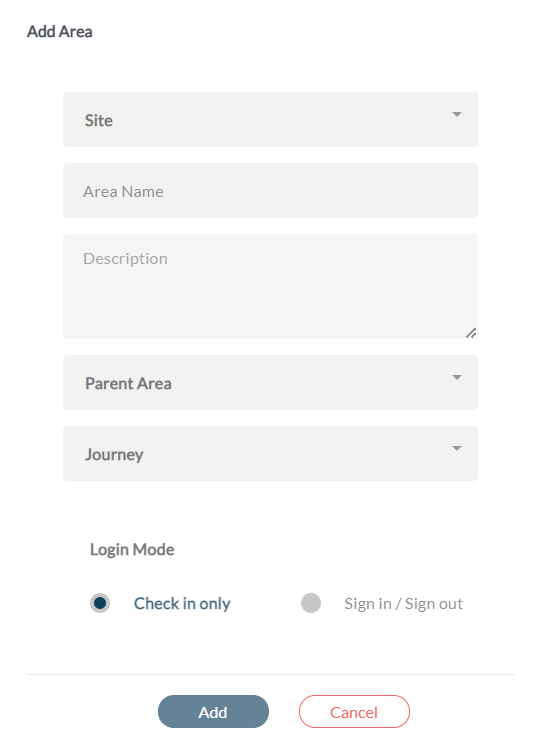
Add a new area
To add a new area, click on the Add button on the top and then Area. You can also add an Area from the available actions at the far right of the Site.
First, you will add the name and description of the area.
Then select the user journey (created in the journey builder).

Login Mode
Next, you will be able to choose between the available login modes.
Sign in / Sign out
Sign in / sign out works like a digital visitor book, or a time and attendance system. When a visitor, staff member, or other user enters your facilities they sign in, and when they leave they sign out. This provides you with a real-time log of who is signed into your facilities and who has signed out.
Sign in / sign out works with any input method and touch mode.
This means users can sign out by clicking the sign out button on screen, by tapping their RFID access card or fob, by scanning their QuickPass QR code, or by scanning their face – depending on which input methods you have allowed.
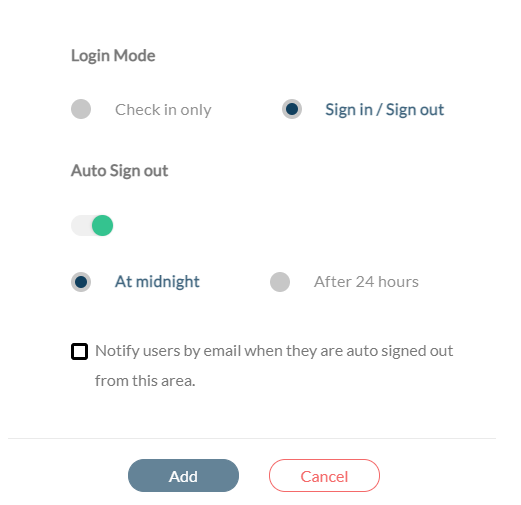
Auto sign out
If you select Sign in / Sign out, another option will appear below called Auto Sign out. This feature will automatically sign out users who have forgotten to sign out as they exit, so it doesn’t skew your logs with users who have remained signed in across multiple days. You can set this to sign users out at midnight or after 24 hours. You can leave this toggle switch off if you don’t wish to use this feature.
If you switch this on, you will see a final checkbox. If enabled the system will notify users by email when they are auto signed out.
Check in only
Check-in mode logs when a user, such as a visitor or staff member, enters the building only.
Also in case, you have a nested subarea it can only have check-in mode not sign in /sign out.
To add a nested area you need to click on add area and assign it to an existing area rather than adding it as a parent area.
As shown in the below picture once you add details for the nested sub-area you will get a disclaimer about the login mode that it can only be check-in only since the main area has sign-in/ sign out mode.
If the main area has login mode as check in only, the nested sub-area in this case can have a sign in / sign out as the login mode.
please note that if you changed area login mode while you have existing visits on the dashbaord all signed in users will be auto signed out and a new visit action will be created as “checked In”
And when changed from Check In mode to Sign In/ Sign Out , a visit action will be created on the daily logbook as “Auto Sign In”
Area settings
On the right-hand side of the grid, next to each area you will find Area Actions. If you click on this button you will find a drop-down menu.
Area kiosk settings
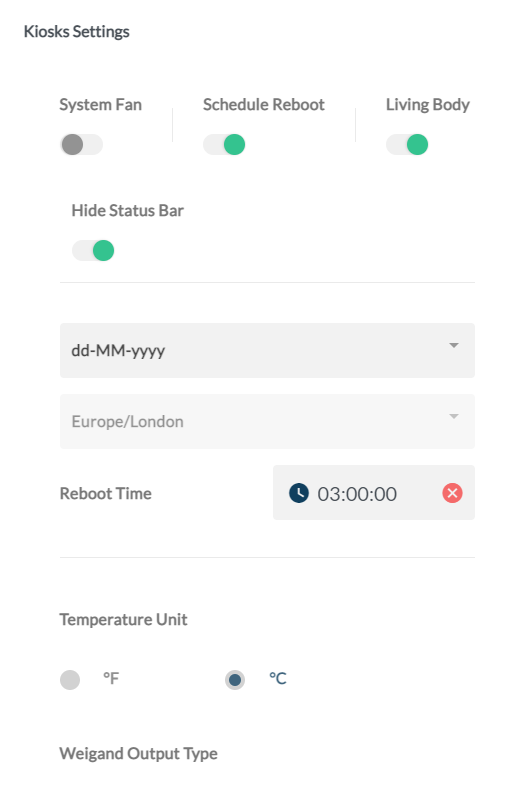
The kiosk settings page controls kiosk settings such as brightness, schedule reboot, date format etc.
When you click on Area Kiosk Settings you will first see a warning that editing kiosk settings here will override any settings already in place, such as at the individual kiosk level.
If you click Continue, the kiosk settings page will appear. You can edit your settings and then click the Update button.
Edit Area
By clicking on Edit Area you can edit the name and description of an area, select the user journey (created in the journey builder) and edit the login mode. You can explore the steps in full in the Add a new area section above.
Move Area
By clicking on Move Area, a pop-up window will appear which allows you to move your area to a different site.
Delete Area
You can click on Delete area to remove an area. Be careful with this. Please ensure you have migrated all nested areas, users & kiosks first!
Kiosk settings
Besides the name of each kiosk, there is a drop-down list on the right that will show available actions for each kiosk.
Kiosk settings
The kiosk settings page controls kiosk settings such as brightness, schedule reboot, date format etc. When you click on Edit Kiosk “KIOSK NAME” Settings the pop-up window below will appear. Once you have finished selecting your options, please click Save.
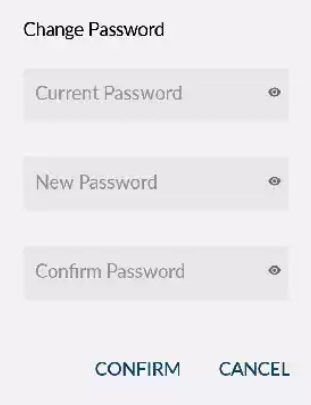
You can also update the kiosk password from the kiosk setting and once you click on it you will be presented with this extension to update the kiosk password which is by default-123456-
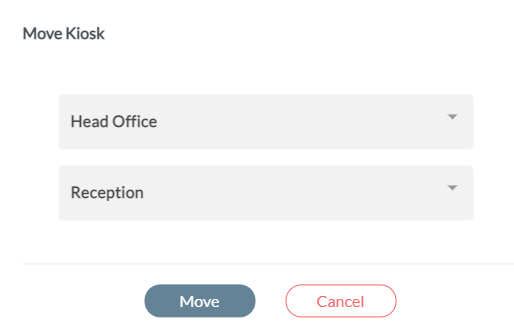
Move Kiosk to
This feature allows you to move the kiosk across different sites and areas from the drop-down menu that will display once you click on it. Once you have selected your options, click on the Move button.
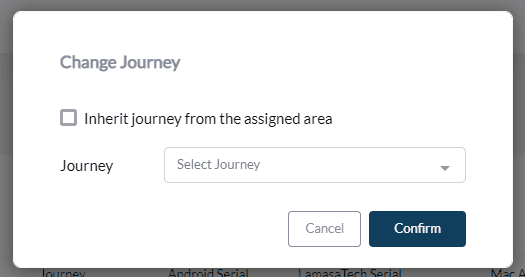
Change Journey:
A kiosk added to the site will by default inherit the journey flow assigned to the area, if you want to change the journey for the kiosk within the same area you can do this from the Kiosk Setting-Change Journey feature, where you will be able to either choose the same Journey applied to them are by ticking the box saying” Inherit Journey from the assigned are” or untick it and this will display an extension showing Journey box to choose from the pre-created Journeys in Journey Builder section.
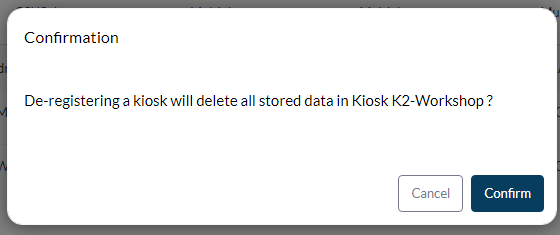
De-register:
To delete all stored data and unlink the kiosk from your dashboard, click on the De-register option. You will be presented with a pop-up message to confirm you want to do this.
Preview Logs:
Show logs of all actions taken on the kiosk including(screenshots, Restarting application, restarting Kiosk, etc.) with action ID, Date, Type of action, Status either success or Fail, and Reason for Failure. and you can also filter and search with a certain date, action or status based on your preference.
Restart Kiosk:
To restart the whole kiosk.
Restart App:
Restart the VisiPoint application only.
Screenshot:
Take a screenshot of the current screen on the kiosk, which can be downloaded to
Get Kiosk Info:
Get full information about the kiosk.
Open Door:
Give direct order to the kiosk to open a door in case connected with a dry relay to a gate.