
Users grid
The Users section is where you can view all your users across all different user types, bulk import lists of users and edit individual users. You can find the Users option on the left navigation.
Once within the Users section, you will find the Users grid which lists all your users. The Users grid has the same logic as all other grids, such as your dashboard grid.
User actions
An important part of the grid on the far right is the available actions button, which you can click to see the actions available for each individual user.

The drop-down box will include the following five options:
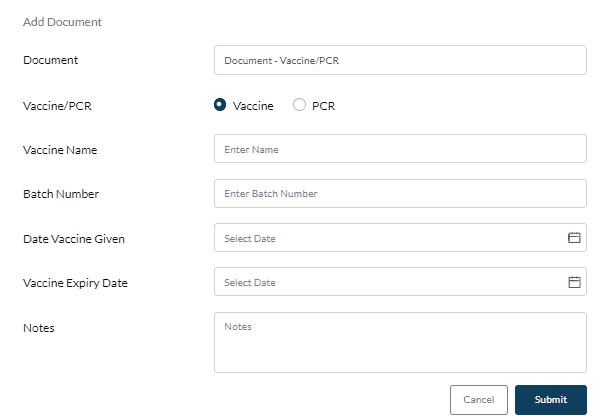
- Add Documents: To add vaccine/PCR documents for an existing user.
- Change user type: This will allow you to change this user to a different user type, for example from a visitor to a staff member. The user type is the main determinant that groups users and tells the system which actions the user should take in the entry process on your kiosks.
- Deactivate User: You can deactivate a user account and leave it on the system so that they don’t have access to the dashboard and won’t be able to use the kiosk as a registered user. This means when they check in using the kiosk they will be checked in as a walk-in rather than staff or visitor.
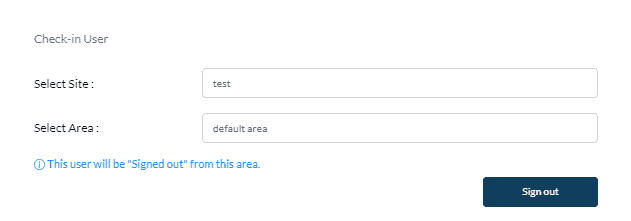
- Check-In User: You can choose to manually sign a user in from the dashboard. Once you click this option you will be presented with this pop-up, which will allow you to choose the site and area the user should be signed into, add user temperature, and if they had a mask or not (depending on your rules).

Using check-in mode, users can be checked into multiple areas. However, using sign-in/out mode, the user can only be signed into one area at a time. The mode is controlled by your journey builder.
If the user is signed into another area already and you sign them into another area, the user will be automatically out from the first area they signed into.
In case you want to sign a user out, you will still click the Check in user button. You will see a message that the user is already signed in and you can sign them out.
- Edit: The edit option will allow you to edit any of the saved information on the user profile including updating RFID, Name, and Vehicle Registration.
- Delete: If you click the delete option, you will be presented with a confirmation message that you wish to delete a user from the system.
Please note that the default system user account used on the initial registration process cannot be deactivated or deleted.
- Invite or Revoke from Dashboard: By inviting a user to the dashboard they will have full admin access. The user will then receive an invitation by email or SMS (depending on the details they have provided) to create a VisiPoint passport account and gain access to the dashboard. If the user already has a VisiPoint passport account they will receive an email or SMS notification to accept or decline the invitation.
Actions for multiple user selection
If you select more than one row, there will be a multi-action button on the top right called Actions for selections. For multiple users, we can change the user type, activate users or de-activate users all at once.

Export users
You can export users by clicking the export button on the top left of the grid. You can export a selection of users or your full list in Excel, CSV or PDF format.
