About the Journey Builder
The Journey Builder screens allow you to define the entry and scanning criteria – defined as ‘Flows’. You can have one flow for all user types or separate flows for each user type, such as one for employees and one for walk-in visitors.
This is useful when you want certain steps to be present in the check-in process for select users and not for others. For example, you may want walk-in visitors to have an ID badge printed for them, whereas this is not required for employees. This would be controlled by having 1 user flow for walk-in visitors and another for employees, each with the relevant steps built into the user flow.
Each user type can only be selected in one user flow.
Accessing the Journey Builder
To access the Journey Builder, go to the Administration screen by double-clicking or tapping on the blue taskbar along the top of the screen and entering the password (the default is 123456). Then click on Journey Builder.
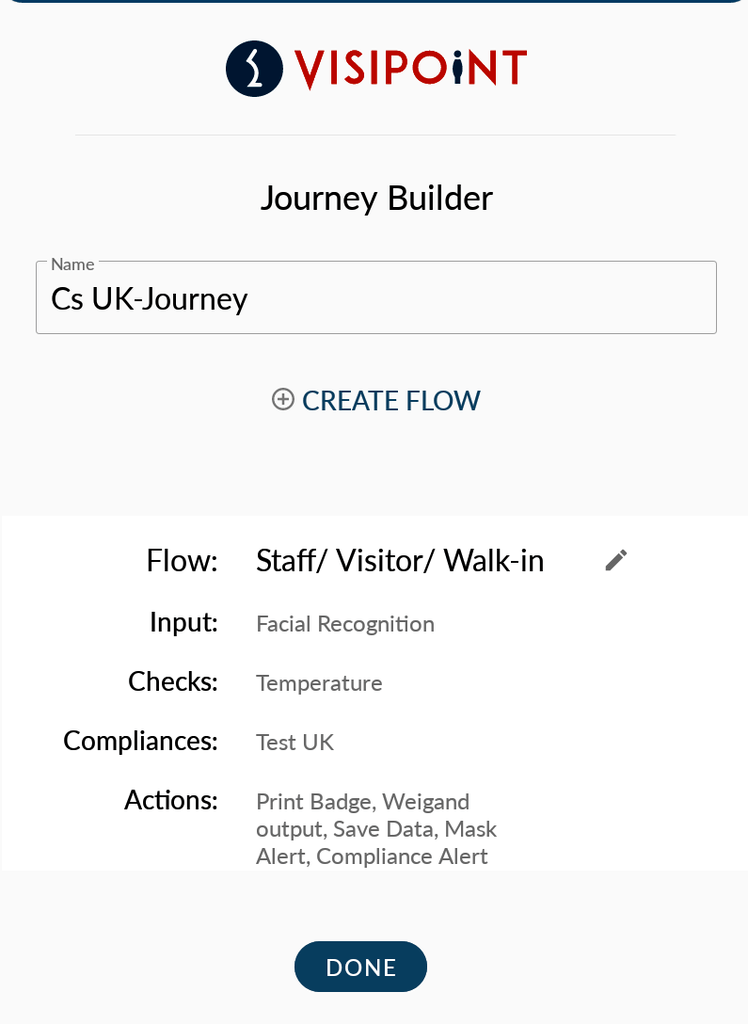
In the Journey Builder page, you will be able to edit and add flows. The maximum number of flows that can be created on the kiosk is 3.
By default, you will only have one Flow.
Creating or Editing a Flow
To build a new flow click on Create Flow. Or to edit an existing flow, click on the pencil icon next to the name of an existing flow.
You can then select one, or multiple user types from the default user types:
- Staff: A frequent user of the kiosk (i.e. daily)
- Visitor: Infrequent visitor, may use the Kiosk on rare occasions
- Walk-in: A visitor who will only visit the facility once
Please note – a user type can only be selected in one user flow. Please remove the user type from one flow before you create another flow for the user type.
Input Type
One of these input types must be selected:
- Facial Recognition
- RFID – Staff/ Visitor RFID card number can be used as an additional input option
When facial recognition and RFID are selected as input methods within the journey builder, either method can be used to gain entry.
QR QuickPass type will be enabled in an upcoming update for Zentron 8 Kiosks.
Checks
Temperature
Can be set to on or off. This setting allows the kiosk to detect the user’s temperature. By clicking on the cog settings icon on the Temperature Check bubble you can select the temperature threshold. By default, this is set to 37.3°C.
Rapid – The kiosk takes a single temperature sample and uses that value.
Sampled – The kiosk will take a number of samples across a three-second window, remove any anomalous readings and return an average of the remaining result.

Mask
Can be set to on or off. This setting allows the kiosk to detect if individuals are wearing a mask. If you have this set to on, an individual without a mask will be denied entry and presented with an instruction to wear a mask.
Compliance
Here you can select any compliance checks that must be reviewed and completed by the user during the check-in process on your kiosk. Compliances that have been created in the Compliance Creator screens will be listed. If no compliances have been created, a new compliance can also be created from this screen by selecting ‘Create Compliance’.
When you have a Compliance added in the flow, you can select how often the compliance will be required to be answered by clicking on the cog settings icon. You can choose from:
- Every time
- Daily
- One-Off
Actions
Here you can select any actions that will be triggered on completion of a scan. All actions are triggered once a scan is complete. The actions are broken down into three categories.
Feedback
Audio – When this is turned on, the Kiosk will play a granted or denied audio message on completion of a scan.
Temperature – When this is turned on, the temperature is displayed on completion of a scan.
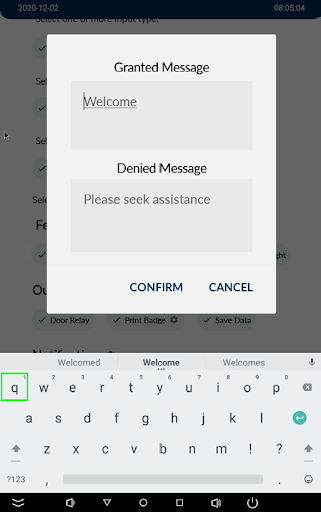
Message – If this is selected, a granted or denied message will be displayed on completion of a scan. ‘Welcome’ (Granted) and ‘Please seek assistance’ (Denied) are the predefined messages. These messages can be edit by clicking on the cog settings icon (on the Message bubble).
Light – When this option is enabled a light at the top of the kiosk will display on completion of a scan; green for granted and red for denied.
Outputs
Door Relay – control of the door connect to the relay cable
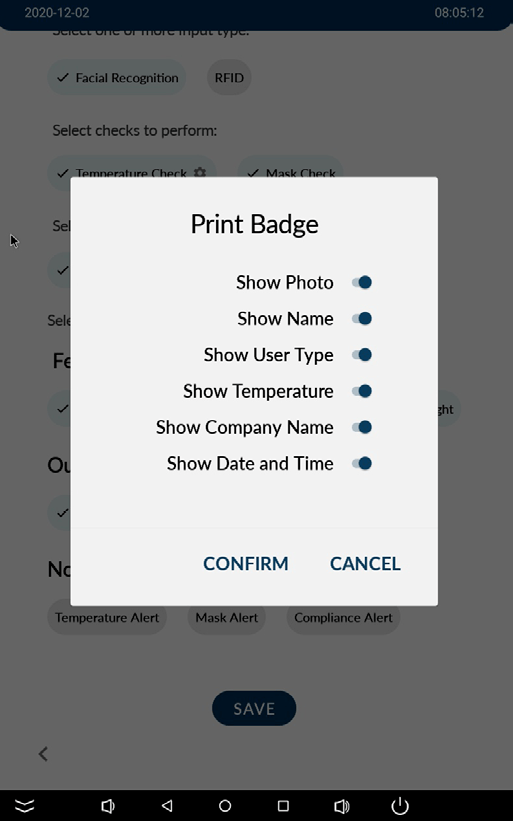
Print Badge Options – If the result of the scan is ‘Granted’ then you can decide whether to print an ID badge. To define what information is printed on the ID badge click on the cog settings icon on the ‘Print Badge’ bubble.
Wiegand Output – Sends RFID card values when RFID scanned or Facial Recognition.
Save Data – Choose if you wish for all scan data to be stored on the kiosk.
Notifications
By entering an email address in the settings icon, and ticking the box, an email alert will be sent in the event of the kiosk following;
- High temperature alert
- No mask detected
- Declined compliance
Notifications will only be sent when the kiosk is connected to the internet.
Finally, click the Save button.