This guide explains how to track vaccination status and/or PCR test results using VisiPoint. A user’s vaccine or PCR status can be gathered using 2 methods:
1. Users have to scan the QR code from their digital COVID pass on the kiosk as they enter*
2. Admins can add a user’s vaccine certificate or PCR result details to the user’s profile on the cloud dashboard
*Please note that your kiosk model must have a built-in QR code scanner to use this method. Zentron 8 and Zentron 15 models have a QR code scanner. The LD-AITemp (Gen 1) model does not have a QR code scanner.
Creating a vaccine status/PCR check from your dashboard
Navigate to Compliance on the left-hand navigation menu.
Click on the Create Compliance button and you will see the compliance builder screen below.
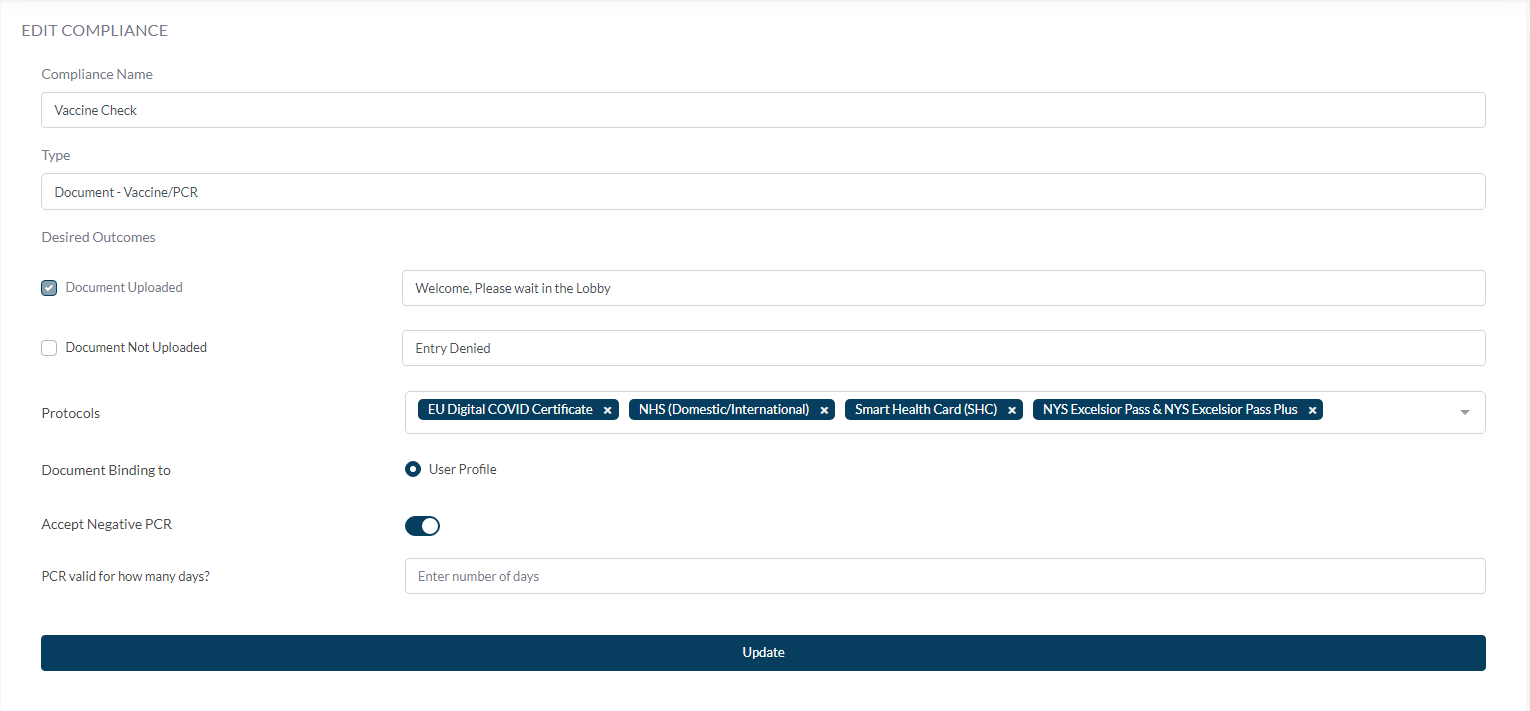
Rename your vaccine compliance as appropriate.
From the Type drop-down menu, please choose “Document – Vaccine/PCR”.
Desired outcome:
- Document uploaded: This means the kiosk will permit entry to those who have submitted their certificate.
- Document not uploaded: This means the kiosk will permit entry to those who have not submitted their certificate.
You can tick and untick the ‘Document not uploaded’ option based on your preference. Both boxes can be ticked if your vaccine/pcr check is not mandatory for entry. The ‘Document uploaded’ option will always be ticked.
Protocols:
This Drop-down list will allow you to choose between 4 protocols based on your preference and what would you accept, noting that you can choose more than one protocol simultaneously.
Settings section:
- Accept Negative PCR: To allow negative PCR test QR codes to be submitted to gain entry.
If you tick this box, a question section will appear asking “PCR valid for how many days?” with a box so that you can set how many days you wish this negative PCR test to be valid for. For example, you may require that users submit a negative test every week so you could set validity to 6 days.
Click the Create button once you are finished with the settings.
Adding the vaccine/PCR compliance check to your entry flow
- Go to Journey Builder from the left-hand menu
- Click edit flow on the user flow which you wish to add the vaccine/PCR check to. If you have created multiple user flows within a journey, you will have to se the arrow on the left of the journey to expand the section and view all user flows.
- In the compliance box, click on the Vaccine compliance you created from the drop-down list of options
- Click the green arrows icon on the right of the box to update the user flow
- Click on cog icon next to Compliance to choose compliance frequency – whether the user must submit a document everytime they enter, daily or once their certificate expires
- Click the Update Journey Buidler button on the top right
Add vaccine/PCR documents to user profiles from your dashboard
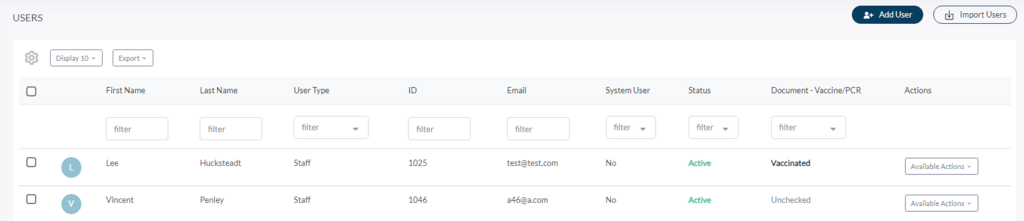
- Navigate to Users from the left-hand menu
- Find the desired user and click on available actions on the right-hand side of the grid
- This will show a drop down menu where you need to click on Add Document
- A pop-up screen will appear to fill in Vaccine/PCR information
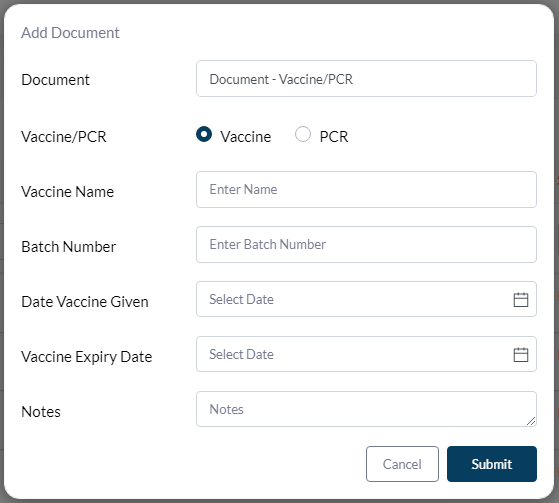
Adding Vaccine Document:
- Select Vaccine for Vaccine/PCR
- Enter the Vaccine Name
- Enter the batch number (not mandatory)
- Fill in all required info and any additional notes then click Submit.
- Once complete, Document- Vaccine/PCR status for the user will change to Vaccinated as below
- If you click on Vaccinated, it will show the Vaccine info added previously, giving you the option to delete the document or disable it.
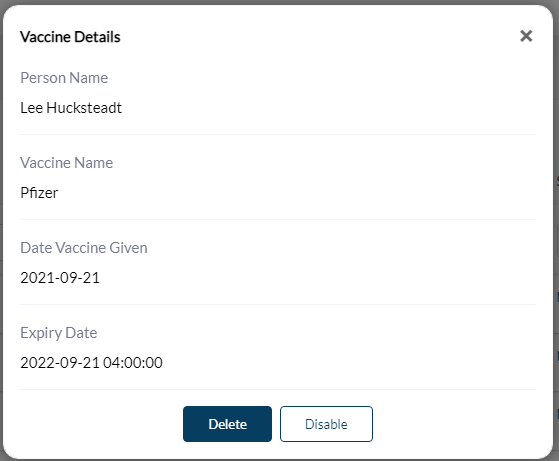
- The status will show the most recent document, the process can go the other way around as well, meaning that if you “Disable” a particular document, the status will show the most recent document before that, deleting the document rather than disabling it will show “Unchecked” as there would be no previous documents to show.
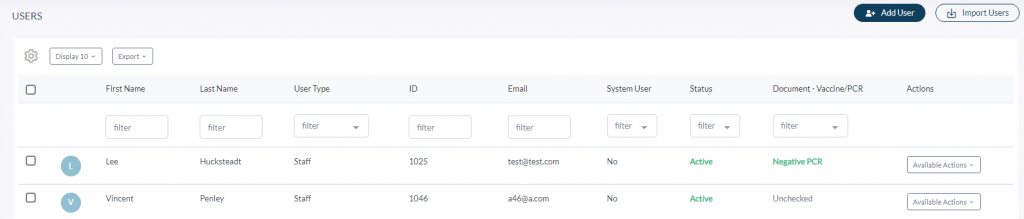
- The document-Vaccine/PCR column shows the latest uploaded document only.
Adding PCR Document:
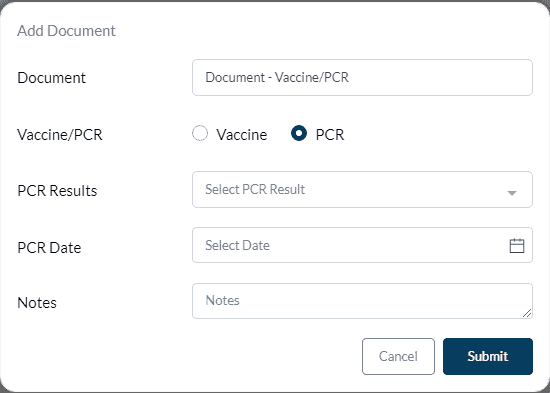
- Select PCR for Vaccine/PCR
- The boxes on screen will change to the following:
- PCR Result: From the drop-down choose either Positive or Negative.
- PCR Date: The date PCR certificate was issued.
- Add any notes.
- Once you click Submit the Document- Vaccine/PCR status for the user will change to Negative PCR as below.
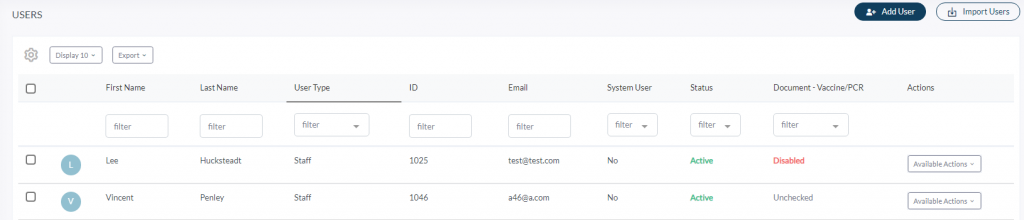
If you click on Negative PCR it will display the below window that will allow you to disable or delete the PCR document, If you click to disable the status will be changed to disabled, which can be re-enabled by clicking on the word ‘Disabled’.
If you click on delete. the grid will display the previously added valid document which in this case is the Vaccine document.
Checking the status of a user from the daily logbook or reports
If you have a Vaccine/PCR compliance check in your user entry flows, the daily logbook and reports will show the status of users in the column named ‘Document – Vaccine/PCR’.
There are a number of statuses which can show, as described below:
- Vaccinated: A vaccine/PCR check is present in the user flow and the user has submitted their certificate (by scanning thier pass on entry or an admin has added a document to the user profile)
- Unchecked: The user did not submit their vaccine pass or PCR test result, manually or by scanning on the kiosk.
- Negative PCR: If you accept negative PCR test results in the user flow and the user has submitted their certificate (by scanning thier pass on entry or an admin has added a document to the user profile)
- Positive PCR: If a user tested positive and will be one leave/working form home, you can add Postive PCR as PCR result adding date and any notes as well.
- Expired: If a user’s documentation has expired.
- Disabled: When you click on any document added on users section, you will have the option to view the document details as well as delete or disable it. If it’s deleted, it will change the status to the latest valid document , if no other added documents it will change to “unchecked”, if it’s disabled, the status will change to “Disabled”.