What is touch mode?
Touch mode allows users to Sign in/Sign out using the touch screen, by selecting an existing user profile or entering their details to create a new profile.
The LD-AITemp (Gen 1) kiosk model does not have a touch screen so cannot utilise this feature. If you wish to upgrade your kiosk please contact your account manager or our support team to discuss upgrade options on cs@lamasatech.com.
How do I activate touch mode on my kiosks?
To activate touch mode, select this option while editing the journey in your journey builder. When you click on Edit Journey, you will see a toggle for touch mode which you can toggle on and then click Update.
Users with a standalone license can edit the journey on their kiosk directly, using the journey builder.
For cloud users, you can edit the journey remotely from the dashboard using the online journey builder.
As touch mode is enabled at the journey level, it will be activated for all flows within the journey. The other input methods (e.g. facial recognition or RFID) can be switched on/off for each user type by using different flows.
Touch mode allows you to have no input method selected in your user flow. You can use touch mode as the sole sign-in method. On the other hand, you can use a combination of touch mode and other entry methods (e.g. facial recognition or RFID).
Touch mode overview
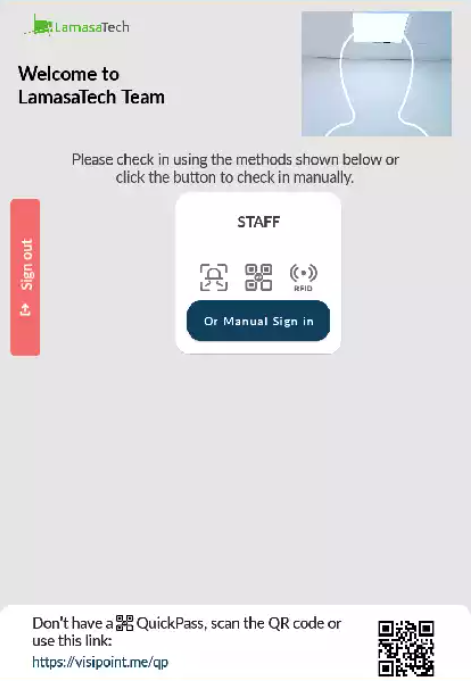
If you activate touch mode on a journey, your kiosk entry screen will update and look something like this:
Users now have the option to click on the ‘Manual sign-in’ button in the relevant user type box, to sign in using the touch screen.
With touch mode, users would sign in by typing their name and choosing an existing profile. If they do not have a profile already, they can easily register their details by selecting the add profile option.
If you have sign-in/sign-out selected in your area login mode, you will also see a red sign-out button on the left, so users can sign out when leaving your facilities. This provides you with an accurate log of when a user entered and when they left.
If you have check-in only selected in your area login mode, there will be no sign-out button. Users can only check-in, as shown on the screen below:
Your login mode is selected in your area settings, where you also apply your journey.
User types
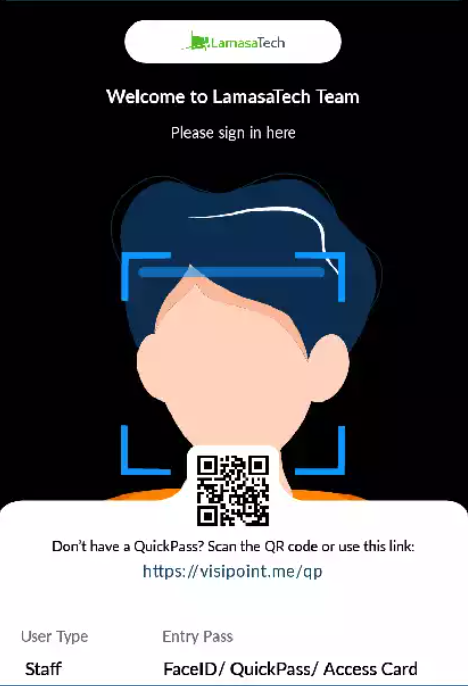
With touch mode, each user type will have a box on the screen, which indicates how that user type can sign in and any requirements such as a vaccine certificate.
With a Standalone license, you will be able to show the three default user types, staff, walk-in, and visitor, on the entry screen.
With a Cloud Professional or Enterprise license, you can create custom user types – for example you could add a user type for Contractors or Volunteers. Once you’ve added a user type on the dashboard, it can be shown on the entry screen. Users will be able to scroll through the user types if you have more than 4 user types enabled.
Entry method icons
The icons shown below the user type name in each box indicate the input methods that the user type can use to sign in.
The icons will only show if the input method is selected in the user flow.
If no icons show, touch mode is the only sign-in option.

Facial Recognition – This icon indicates that the facial recognition input method has been turned on. Users can approach the kiosk and sign in by looking at the camera, which will match their face to the photograph on their profile. When creating an account users will have their photograph taken if facial recognition is part of the flow.

QR code scan – This icon is shown when users can use a QuickPass QR code to sign in. Users will be able to approach the kiosk and present their QR code to the scanner at the bottom right corner of the device to sign in (LD-AITemp (Gen 1) kiosks do not have a QR code reader).

RFID scan – This icon will be shown when user types are able to sign in with an RFID card/fob. Users with an RFID card/fob linked to their profile will be able to tap it against the RFID logo on the bottom of the device, to sign in.
The touch login process for walk-ins
Walk-in users will press the ‘Or Manual Sign-In’/ ‘ Or Manual Check-In’ button to begin the process.
This will take them directly through any checks required in the flow, such as temperature check and vaccine certificate.
The user will then be presented with any questionnaires/agreements that are part of your entry process.
Walk-in users will NOT be able to create a profile using touch mode. This user type skips the page allowing users to select or add a profile.
For a walk-in user to be able to create a profile the QR code entry method must be enabled as an input method and walk-in users will need to create a QuickPass QR code and use this to login.
The touch login process for visitors
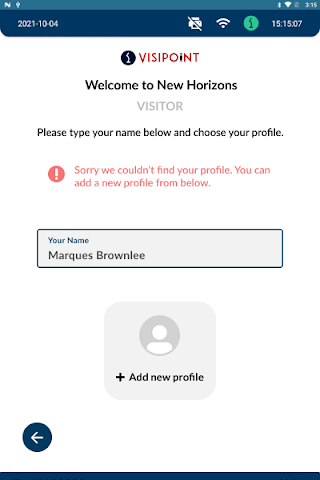
Visitors will click on the manual sign-in/ check-in button and then begin to type their name. The system will start looking for matching profiles.
Once the correct profile has been selected, the visitor will be taken through the journey flow as designed, with steps such as temperature measurement and agreements/questionnaires.
If a visitor has no existing profile, they can simply click on Add new profile:
The visitor should create their profile on this page by entering their details and taking an ID picture. To add a photograph the user will need to click on the camera icon. This will activate the camera.
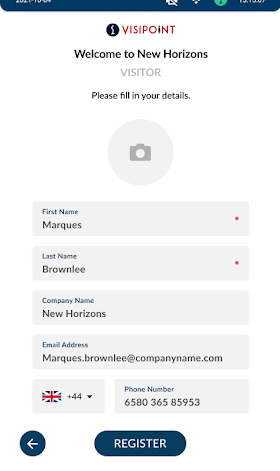
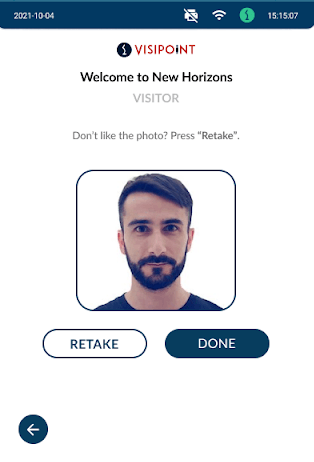
The user will be prompted to accept the photo or retake it if they are unhappy with it. When the user clicks done, the photo will be saved to the user’s profile and will appear on their ID badge (if you are using ID badge printing) and can be used for the facial recognition sign-in method.
The visitor will then proceed through any remaining steps in the entry process, such as temperature measurement and agreements/questionnaires.
The touch login process for staff
As a staff member, you will be able to log in using touch mode by typing your name and choosing your existing staff profile.
Staff members cannot create a new profile when they sign in (in the way that visitors can) as this needs to be done by a system admin.

The staff member will then proceed through any remaining steps in the entry process, such as temperature measurement and agreements/questionnaires.
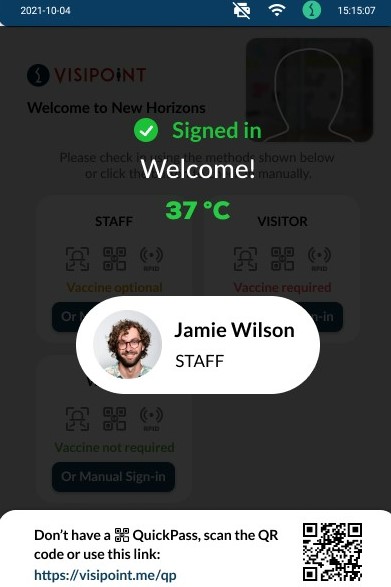
Welcome screen
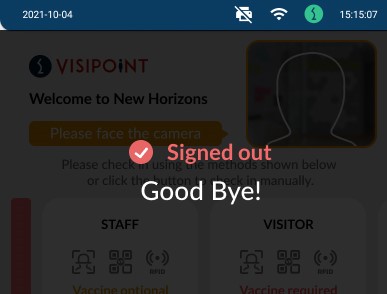
For all user types, once the login process is completed, the user will be presented with a Welcome message on the screen as below :
The touch sign-out process
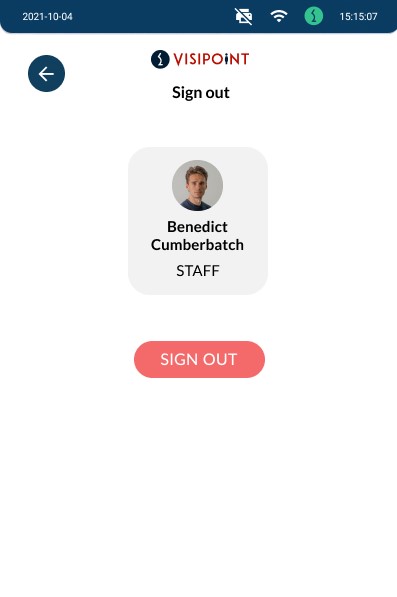
If you are using touch mode and sign-in/sign-out login mode, users will be able to sign out of your facilities.
Users can sign out by clicking on the red sign-out button and searching for the profile.
The only exception is the walk-in user type. Walk-in users cannot sign out, because they don’t have a profile so there is no way to identify them.
Once the user taps the sign-out button the kiosk will display a goodbye message.