
Use this contents list to jump straight to the section you need:
1. Set-Up and Installation
2. Integrations Menu
3. MIS Integration Settings
4. Wonde Configuration
5. Attendance Codes
6. Actions
7. Terms and Conditions
8. Student Logs and User History
9. Tying It All Together – Example Scenario
1. Set-Up and Installation
VisiPoint uses a service called Wonde to integrate your School’s MIS with VisiPoint. In the early stages of a MIS integration, we will:
- Send a request for access to the School’s MIS through Wonde
- Work with you through the approvals process
- Connect the service once approval has been granted
- Activate the MIS integration on your dashboard
2. Integrations Menu
At the top right of your dashboard, you will find an Integration button (circled in red in the image below). When you click on the Integration button, select the drop-down for Wonde. Once on this overall settings page, you will see a page that resembles the image below.
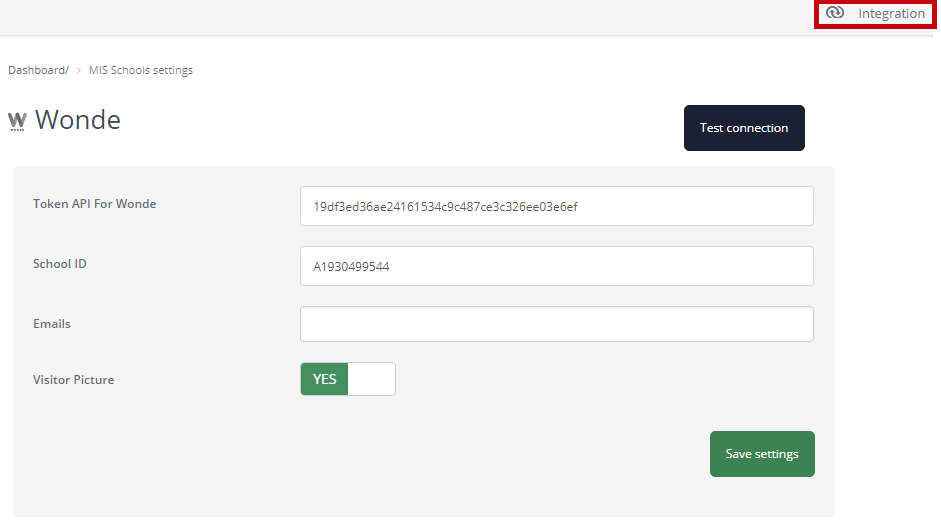
You will not need to alter the first two fields as these will be populated by VisiPoint during the set-up phase. On this page, you can:
- Enter an email address that you’d like MIS-related correspondence sent to – enter it in the ‘Email’ box and hit ‘Save’
- Select whether or not you’d like the VisiPoint device to take a photo of the student or guardian during the sign-in process. This can be useful for security and audit purposes.
You can test the connection between VisiPoint and your MIS is active by pressing the ‘Test Connection’ button. It will display a green successful connection message if all is working as it should be. You should check this if for whatever reason you have issues with MIS sign-in. If this green success message does not display, you should contact our support team at support@visipoint.net
3. MIS Integration Settings
On the left-hand navigation of your dashboard, you will find an Integration Menu with your Wonde options. Here’s a quick explanation of the menu options:
- Wonde Configuration: Here you can control which data lists sync between your MIS and VisiPoint such as your staff and student lists.
- Attendance Codes: This is a feed of the attendance codes that are pulled directly from your MIS, such as the code for lateness or medical appointments.
- Actions: Actions allow you to control the student sign-in/out functionality on your devices as well as check-in/out for exceptions (pupils arriving late or leaving early).
- Terms and Conditions: Here you can set specific Terms and Conditions to be presented during the student sign-in/out process on your devices.
4. Wonde Configuration
In this section, you can control which data lists sync between your MIS and VisiPoint. We will set this up for you according to your request during set-up and installation, but you have the settings here to change as you see fit.
Depending on the MIS system you utilise there will be read and/or write options available. For example, schools using SIMS will have the option to read and write the student lists but only read the staff lists. The read setting means the list will sync to VisiPoint from your MIS and will update when there are any changes. The write setting means that data collected in VisiPoint about a user will be written back into your MIS e.g. late arrival one morning.
Note of Caution – If you change the settings here, the profiles will be deleted from the appropriate address book, and thus any settings such as RFID permission and PINs will need set up again. Their user history will still appear in the logs and reports so you won’t lose that history. If you are already using the MIS integration and would like to change your settings, please contact us at support@visipoint.net and we can help you change this over more smoothly.
To Set Up a New Student Sync
- Select Sync Entity:
Here you can choose from the sync entity according to your MIS – select student. - Choose User Type:
Select the VisiPoint user type which you would like to link with. If all pupils will use the system in the same way then you can select the default Student user type. Otherwise, you will need to create a new user type first – see the post on user types here. For example, if you want different sign-in/out or check-in/out options for different year groups you’ll create a user type for each. - Choose Years:
Select the year group lists from your MIS that you want to feed into VisiPoint. If you are using the default Student user type then tick the checkbox against all year groups. - Click on the add button.
- The new sync will appear in the User Permissions table below. From here you can toggle the read/write options available or edit the sync. If the write functionality is not available for that sync entity, there will be no toggle function in the column.
To Set Up a New Staff Sync
- Select Sync Entity:
Here you can choose from the sync entity according to your MIS – select staff. - Choose User Type:
Select the VisiPoint user type which you would like to link with. You will need to create a new user type if you haven’t already created your own user type for staff – see the post on user types here. There isn’t the option to use the default staff user type because once a sync is set up, the staff list becomes a feed only and you lose the ability to amend it within VisiPoint.
- Choose Company/Department:
Choose from the list of your created departments e.g. Science. If you don’t use departments within VisiPoint then select No Company/Department. If you need to create a new department see this post. - Click on the add button.
- The new sync will appear in the User Permissions table below. Staff sync is read-only functionality for the moment so there will be no toggle button within the write column.
5. Attendance Codes
The attendance code list is a feed taken directly from your MIS and cannot be amended within VisiPoint. However, you can re-sync the Attendance Codes directly in this menu by pressing the Resync button.
The attendance code list contains:
- ID: This is the number that acts as a unique identifier for the Attendance Code in your MIS system
- Code: This is the code that will be entered in your MIS when the student selects a reason that corresponds to this attendance code
- Description: This is a short description which outlines the function of the attendance code
- Type: Can be either Void, Authorised or Unauthorised
Example of an attendance code list in VisiPoint:
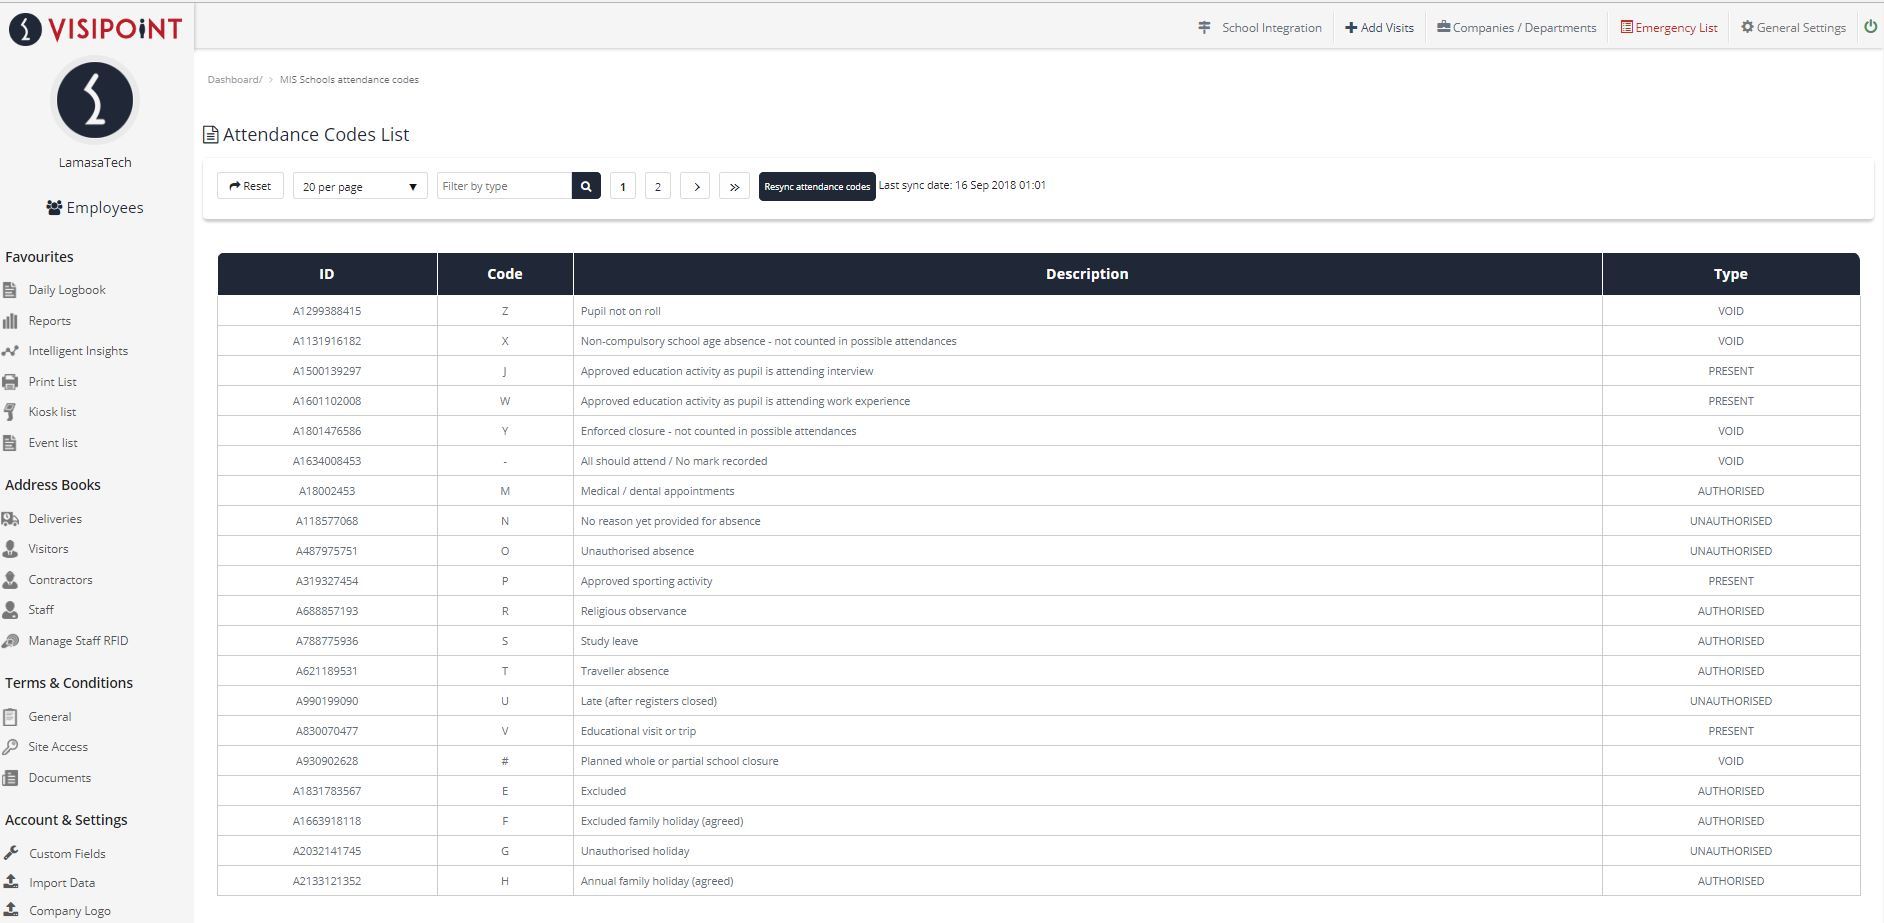
When you set up your actions – which dictates the actions which your students can take on the device – you will select a corresponding attendance code. Actions are your user-friendly terms that users will select on the device e.g. doctor’s appointment. When a student or guardian selects a reason on the VisiPoint device, the corresponding attendance code is written from VisiPoint into your MIS.
6. Actions
Actions allow you to control the options for students/ guardians on your devices e.g. whether they can sign in/out of the building via VisiPoint or whether they can only check in/out in the case of an exception e.g. lateness. Here’s a couple of examples to illustrate:
A primary school may not use student sign-in/out on VisiPoint as attendance is registered by teachers. However, parents/guardians can check out their children for medical appointments on the VisiPoint system. This attendance code will be automatically synced with the MIS system to save the office team from having to input this manually.
A secondary school may want Sixth Form pupils to sign in and out through VisiPoint as they can leave the school during free periods. That school may also want to record where they are within the school grounds by using check-in/out actions at the different buildings.
Adding a New Action
- Select Actions from the left-hand navigation.
- Click ‘Add New Action’
- Give your action a user-friendly name such as a medical appointment.
- Select the Action Type.
– Sign-in/out: This signifies the normal sign-in and out process conducted through VisiPoint, which registers a user’s presence at the school.
– Check-in/out: Check-in/out does not affect the sign-in status of an individual (and in turn the emergency list). It is most commonly used where pupil attendance is not registered by VisiPoint, but where late arrivals/ early leavers can be registered by a parent/ guardian on VisiPoint to sync back with your MIS. - Select whether to take a photo of the student at sign-in when using this reason (if you select yes here but have the photo capture set to no in general settings, this will override your general settings)
- Select whether to show Student Terms and Conditions with this reason (this will again override your general settings)
- Select your attendance Code Type. These can be either Fixed or Conditional, depending on the nature of the reason you’re creating.
You may want to use conditional if your school has different parameters for different times of the day. For example, a late sign-in may be Conditional if the student is signing in in the morning before your registration period closes, after the registration period or in the afternoon. However, if a student was signing out for a doctor’s appointment this would likely be a Fixed reason. - Save your Reason.
Check-in/out actions can be used as well as sign-in/out actions for any user type. You will need to create Actions for every type of sign-in/out and check-in/out you wish to capture on your VisiPoint devices.
7. Terms and Conditions
Here you can copy and paste your terms into the box, then hit save. Your devices will then ask users to read and accept these specific Terms and Conditions during the student sign-in/out and check-in/out process.

8. Student Logs and User History
The daily logbook is your dashboard homepage which you can navigate to any time from the favourites section on the left-hand navigation.
The daily logbook is one unified logbook where you can filter by user type for the logs of students and staff. You can also filter by date, sign-in status, and department.
Your MIS information should be kept in sync in real time, however, you can also click the Upload to MIS button to force a sync.
With the address books, you can also view individual user history by clicking on a user’s profile.
9. Tying It All Together – Example Scenario
A school may want Sixth Form pupils to sign in/out on VisiPoint because they can leave the school during free periods. However, for all other year groups, they only want check-in/out functionality for late arrivals/ early leavers e.g. in the case of a medical appointment.
In this case, you would:
- Create a Sixth Form user type in VisiPoint and choose the year group to sync with from your MIS in Wonde Configuration Settings
- Within your Actions create your sign-in/out actions and select only the Sixth Form user type to have these actions
- In Wonde Configuration, sync all other year groups with the default Student user type (or create a new one if you wanted a different name for the user type!) and then select this user type with your check-in/out actions.
Need some extra support? You can submit a support request by email to support@visipoint.net
