For the occasions where you are expecting a visitor, you can create a visit in advance. This makes the sign-in experience even quicker on the day and adds an expected visitor to your dashboard.
This article describes this feature for admin users of VisiPoints. For staff, who can create their own visits through their restricted view of the dashboard, click here.
Method 1: Booking appointment with full visitor details
If you have all the visitor’s details, you can add the following points:
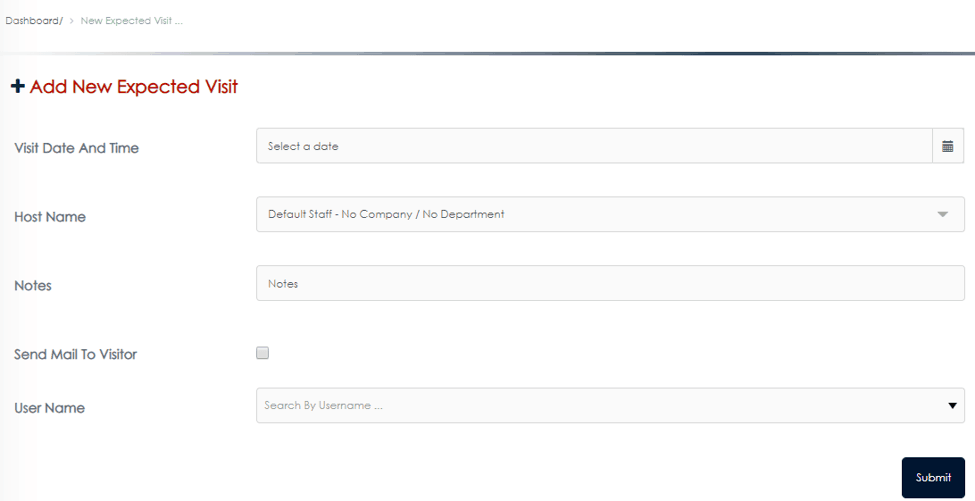
- Click ‘Add Visits’ from the top menu bar.
- Select the expected date and time of the visit.
- Select the host name (from the list of your staff).
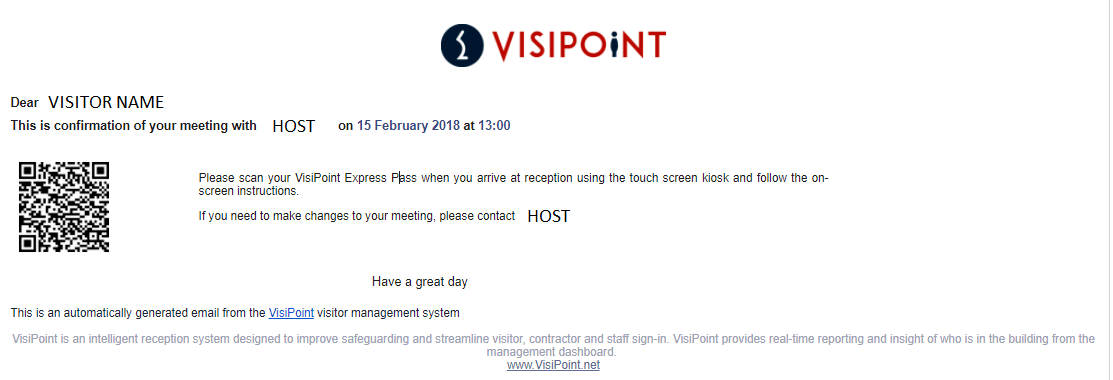
- You have the option to send the user an email alert informing them that their visit has been booked. To do so simply tick the checkbox next to ‘Send Mail to Visitor’. After you submit, the system will send an automatic email to the email address saved on the VisiPoint dashboard for this user. The Express Pass QR code in the email can be swiped under the barcode reader when the visitor arrives and allows them to skip past the initial sign-in stages such as entering their name and email address. The email will resemble the below:

- Select the user name (choose the name from your list of visitors and contractors)
Note – if they’ve been to visit before their details will appear, so select as necessary. If the system doesn’t recognise the name, additional fields will appear. Firstly pick if they are a visitor or a contractor, then add your new visitor’s details. The system will remember them for the next time. - Hit ‘Submit’
You’ll then be taken back to the Daily Logbook, which acts as your calendar of visits. If you change the date in the bar under Daily Logbook, you’ll see the visit you’ve just added as ‘EXPECTED’ on the date you have just added the visit.
Method 2: Send a link for visitors to register their own details
If you’d like to give the visitor the option to register their own details, you can use the Pre-Registration feature. This is especially useful if there are a number of different people who will be joining the meeting, and you may not have all the details for.
This feature creates a unique URL based on the time and date of visit which you will enter. You can then copy this link and send it by email to as many people as you want. When users click on this URL they will be directed to VisiPoint where they will register their personal details before their visit.
- Click ‘Pre-registered visits URL’ from the navigation on the left

- Hit the ‘Add new pre-registered URL’ button
- Visit Date – select the date and time of your visitor’s appointment.
- Expire at – this allows you to expire the link on a chosen date.
- You will now see the link you’ve created.
- You can copy this link and send it to whomever you choose. If there are multiple people attending the visit they can all use this URL to add their details.

Upon filling out their details the visitor will automatically receive an email informing them that their visit has been booked. The Express Pass QR code in the email can be swiped under the barcode reader when the visitor arrives and allows them to skip past the initial sign-in stages such as entering their name and email address. The email will resemble the below:
Once the visitor has filled out their details, you’ll be able to see the visit as ‘EXPECTED’ in your Daily Logbook. The visitor’s host will also receive an email confirming the appointment.
Need some extra support? Speak with our expert team at support@visipoint.net or click the live chat bubble from within your dashboard.