Quick links to the section you need:
1. Prerequisites – Areas and Destinations
2. Membership Logbook
3. How to Create a Membership
4. How to Create a Member
5. How to Add a Secondary Member
6. Guests
7. Managing Member Emails
1. Prerequisites – Areas and Destinations
In order to create a Membership, it’s useful to set up your Areas and Destinations first. Membership uses Areas and Destinations to direct Members to the appropriate areas in your premises and controls access to the locations or facilities that you use to sell memberships and up-sell membership levels.
You can find our guide for creating Areas and Destinations here.
2. Membership Logbook
The Membership Logbook is a record of member activity on a day-to-day basis, much the same as your Daily Logbook which lists all your visitor activity. You can access the logbook by accessing the Daily Logbook and selecting ‘Membership Logbook’ on the second tab, or you can click on ‘Membership Logbook’ under Membership Logbook on the left-hand navigation. The logbook is a daily report of:
- Member sign-ins
- A summary of their activity
- Secondary user sign-ins
- Any guests who have signed in with members
- Any guests who have registered on the kiosk
3. How to Create a Membership
Before you can add members, you need to create your membership types which differ based on the stipulations you set such as access areas and membership period.
- From the dashboard, select ‘Membership List’ underneath Membership Module from the navigation on the left-hand side of your screen.
- You’ll now be viewing the membership list. This is a summary of all the memberships that you’ve created. From here you can duplicate, edit and delete active memberships.
Note – because many memberships are broadly similar with small changes for up-selling, you might find it easier to duplicate memberships rather than create each one from scratch. - Click on the ‘Add New’ button on the right-hand side.
- You will now be viewing the New Membership form. Here’s an example:
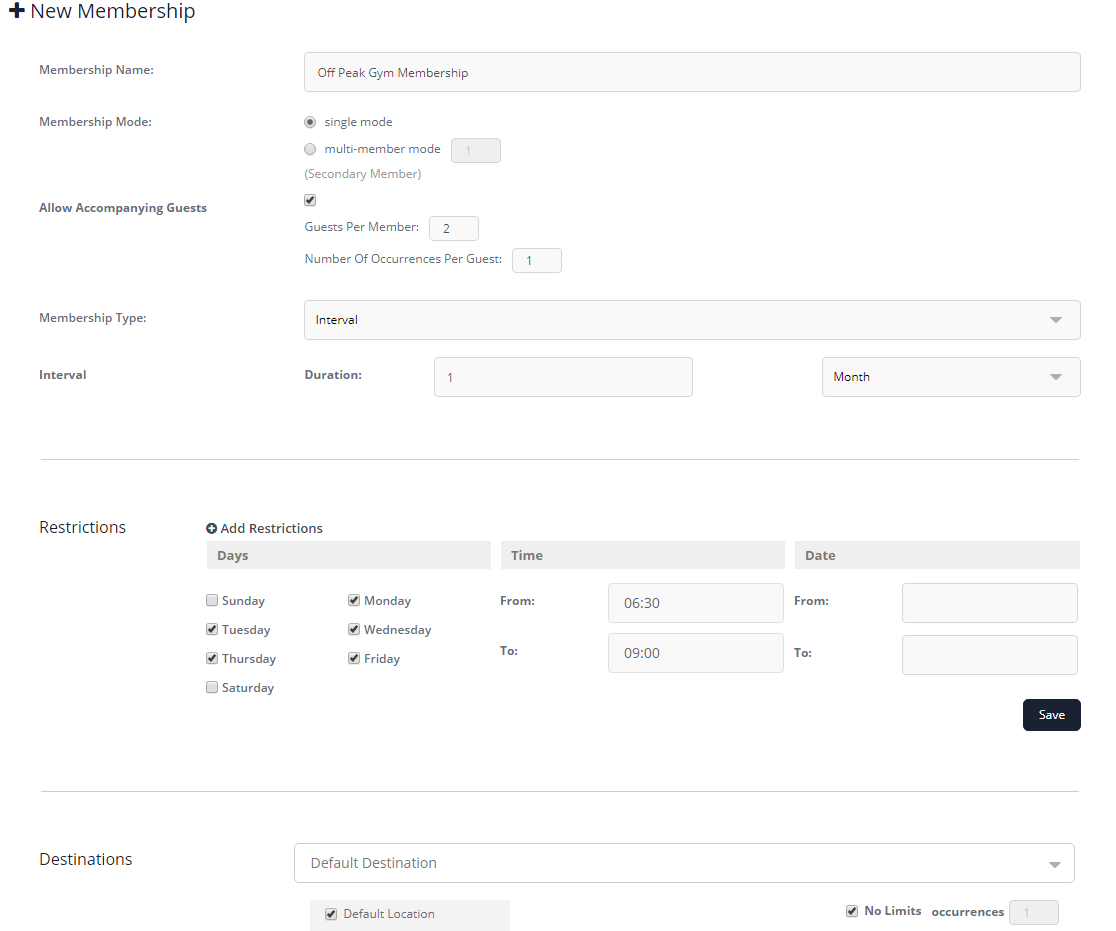
– Membership Name: Enter a name for your membership type.
– Membership Mode: When creating memberships, you may wish to create a standard single-user membership, or a multi-user membership for family memberships or corporate team memberships for example. Check the box to select ‘Single Mode’ or ‘Multi-Member Mode’. In Multi-Member mode you then enter a number in the box to dictate how many secondary members are allowed within the multi-user membership. For example, if your family gym membership allows 4 people, you would enter 3 in the box for the number of secondary members permitted on top of the main user.
– Allow Accompanying Guests: Here you can check the box to allow users of this membership to bring guests. This can be incredibly useful in order to promote your facilities to new prospects and capturing guest information to feed into your marketing list to increase membership numbers. You can choose how many guests this member is allowed to bring over the course of their membership by entering the number into the ‘. You’re also able to set how many times the guest can use the membership facility by entering the appropriate number into the ‘
– Membership Type: Select from ‘Period’ (date range from-to) or ‘Interval’ (1 day/week/month/year from date of creation.)
– Restrictions: In this section, you can restrict by days, times or dates. This is useful to create memberships such as peak and off-peak.
Note – The restriction is placed on the day you select. If for example, you want to restrict access on a Monday, you’d select ‘Monday’ as the restriction, rather than ticking to allow every other day.
– Destinations: Here you’ll find each of your areas with its own drop-down. Under each area, check the boxes to allow access to locations. With each checkbox, you’ll see an occurrences box. In this box, you can enter a specific number of occurrences if you want to limit the number of visits to a location per member. If you don’t want to set any limits, just tick the ‘No Limits’ checkbox.
4. How to Add a Member
- From the dashboard, select ‘Members List’ underneath Membership Module from the navigation on the left-hand side of your screen.
- You’ll now be viewing the list of all members. From here you apply certain filters such as membership type, status and expiry to find specific groups of members. You can also print the members list.
- Click on the ‘Add New’ button on the right-hand side.
- Here you can select ‘Select Existing User’ to create a membership for someone who already has a profile on the VisiPoint system from the list such as a visitor or staff member, like in this example:
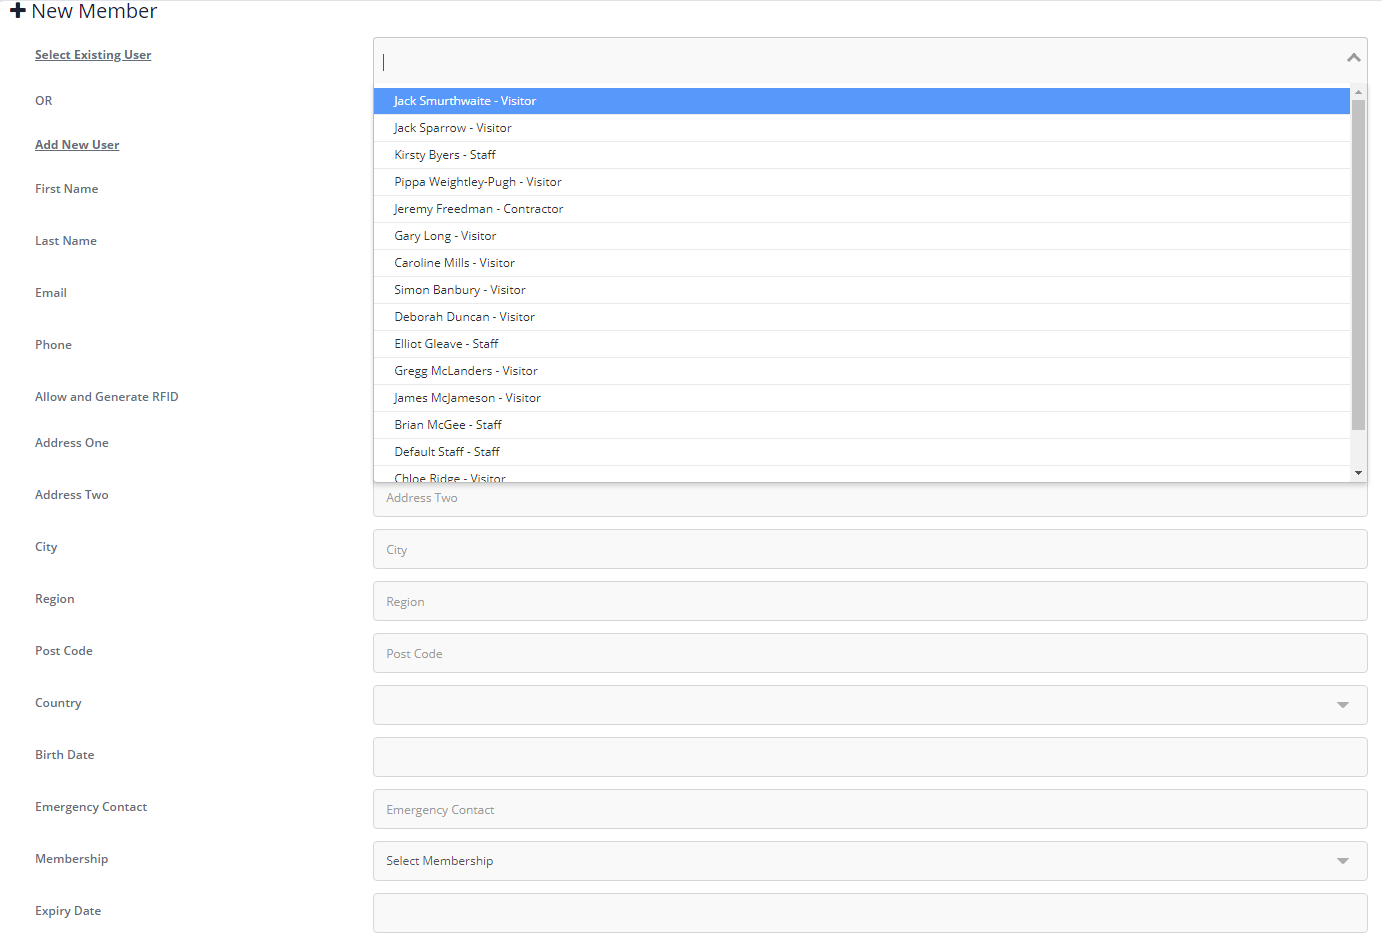
Or you can ‘Add New User’ by entering their personal details, like in this example:
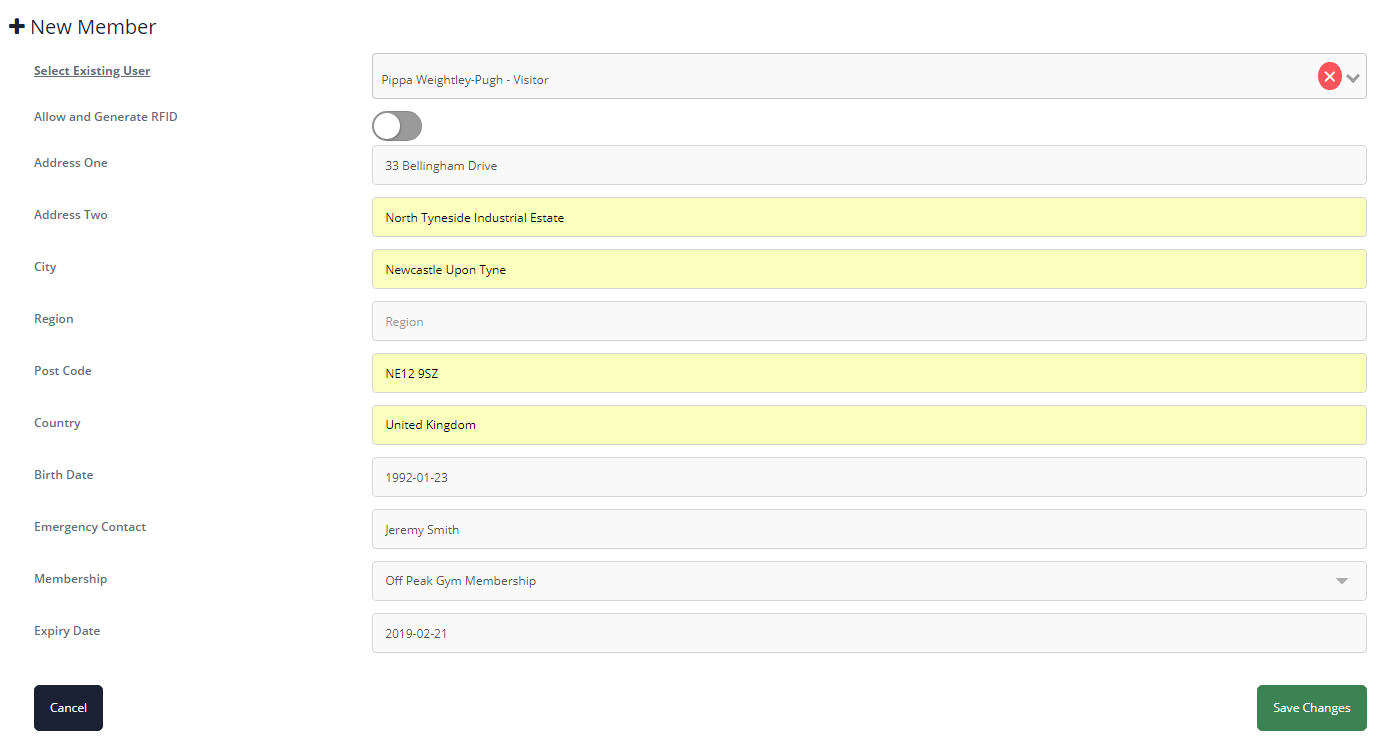
- Complete their profile. Personal data will not appear on the kiosk, but you may need to issue letters or get in touch with an emergency contact, so this information is safely stored on the user’s profile, accessible only by admin-level users.
– Allow and Generate RFID: Move the toggle to green to allow RFID sign-in for this user. The user will get an RFID pin that they can use to match a door card or fob to the VisiPoint system. This allows them to swipe their access card or fob on the VisiPoint device to sign in.
– Membership: Select the Membership type for the user.
– Expiry Date: This will auto-populate based on your membership choice, but you can also edit the expiry date for special cases.
Members of Single Mode memberships and members who were responsible for signing up for Multi-Member Mode memberships will be classified as Primary members in VisiPoint.
5. How to Add a Secondary Member
For multi-member memberships, for example, a family membership, you can add the secondary members to the membership from the VisiPoint dashboard.
A breakdown of the steps to follow:
- Select ‘Members List’ from the left-hand side menu, under Membership Module.
- Find the primary member for the membership on your list. You can filter the member types by using the ‘All Types’ drop-down and selecting ‘Primary’. Click the user’s name and you’ll be taken to their user profile.
- At the bottom of the user profile, click the ‘Edit Member Information’ button.
- Enter their personal details and hit ‘Save’.
Note: Because Secondary members are tied to the primary member, they share a membership number.
6. Guests
There are 2 ways to introduce guests to your membership customer journey:
- Members, with a valid guest allowance, can sign in a guest with them on the VisiPoint device during their sign-in
- Devices in Register Mode, allow guests to register themselves by pressing the Guest button and following the sign-in process. You can activate Register Mode in your Area settings. Remember to also configure your device layout in Kiosk Layout by selecting to display the Guest button.
7. Managing Member Emails
Within the dashboard, you have the tools to configure and customise the emails that you send to members. The email builder allows you to:
- Personalise your communications with members
- Change the wording of automated responses
- Change the information you include in the email
- Choose who receives emails, and when
Email Settings
You’ll find email settings under Membership Module on the left-hand navigation menu. Within email settings, you can easily toggle a number of settings to YES or NO. These settings control the email notifications that go to the admin and receptionist email addresses (from the general settings) and the members themselves.
You can select these individuals to receive emails when:
- A member signs in
- A member signs out
- A new member is created
- A membership expires
- A new guest signs in
- A member’s guest allowance expires
Email Template Customisation
You can customise the content of the emails that are automatically generated by VisiPoint.
- Click ‘Email Templates’ under Membership Module on the left-hand navigation of the VisiPoint dashboard.
- You will see a list of the available email templates, one for each of the email settings.
- You can select to show to preview the email or edit to be taken to the editor.
- In the editor, you can freely customise the email, adjusting the messages as you see fit. The following personalisation tags can be inserted into the email. They’ll pull in the customer profile information or visit information from VisiPoint, for example, the member’s name or the arrival time on their visit. You can copy and paste these into the text of your email where appropriate. The commands are as follows:
##arrival_time##
##departure_time##
##member_first_name##
##member_last_name##
##member_email##
##membership_name##
##membership_mode##
##membership_type##
Got further questions or need a helping hand? You can speak to our dedicated support team at +44 (0) 191 341 0016.